contacts,api,2,0,and,above,android,developer,tutorial
Read More..
Showing posts with label view. Show all posts
Showing posts with label view. Show all posts
Saturday, April 30, 2016

Wednesday, April 20, 2016
Using View Flipper in Android
Suppose you want to display a news bar in your activity. this news bar displays a single news item at a time then flips and shows next item and so on, then your choice would be Androids ViewFlipper.
ViewFlipper inherits from frame layout, so it displays a single view at a time.
consider this layout:

now we want to flip the views when the button is clicked
if we want to flip in reverese direction we could use
flip.showPrevious() instead
we can add animations to the child views when they appear or disappear:
we can also set the ViewFlipper to flip views automatically when the button is clicked:
we can stop the flipping by calling flip.stopFlipping(); method.
or we can set the flipper to flip autommatically when the activity starts
Read More..
ViewFlipper inherits from frame layout, so it displays a single view at a time.
consider this layout:
<?xml version="1.0" encoding="utf-8"?>just a ViewFlipper container that contains three text views
<LinearLayout
android_orientation="vertical"
android_layout_width="fill_parent"
android_layout_height="fill_parent"
>
<TextView
android_layout_width="fill_parent"
android_layout_height="wrap_content"
android_text="@string/hello"
/>
<Button
android_layout_width="wrap_content"
android_layout_height="wrap_content"
android_text="Flip"
android_id="@+id/btn"
android_onClick="ClickHandler"
/>
<ViewFlipper
android_layout_width="fill_parent"
android_layout_height="fill_parent"
android_id="@+id/flip"
>
<TextView
android_layout_width="fill_parent"
android_layout_height="wrap_content"
android_text="Item1"
/>
<TextView
android_layout_width="fill_parent"
android_layout_height="wrap_content"
android_text="Item2"
/>
<TextView
android_layout_width="fill_parent"
android_layout_height="wrap_content"
android_text="Item3"
/>
</ViewFlipper>
</LinearLayout>
now we want to flip the views when the button is clicked
public void onCreate(Bundle savedInstanceState) {
 super.onCreate(savedInstanceState);
 setContentView(R.layout.main);

 btn=(Button)findViewById(R.id.btn);
 flip=(ViewFlipper)findViewById(R.id.flip);

 }

 public void ClickHandler(View v)
 {

 flip.showNext();

 }
if we want to flip in reverese direction we could use
flip.showPrevious() instead
we can add animations to the child views when they appear or disappear:
@Override
 public void onCreate(Bundle savedInstanceState) {
 super.onCreate(savedInstanceState);
 setContentView(R.layout.main);

 btn=(Button)findViewById(R.id.btn);
 flip=(ViewFlipper)findViewById(R.id.flip);
 //when a view is displayed
 flip.setInAnimation(this,android.R.anim.fade_in);
 //when a view disappears
 flip.setOutAnimation(this, android.R.anim.fade_out);
 }
we can also set the ViewFlipper to flip views automatically when the button is clicked:
public void ClickHandler(View v)
 {


 //specify flipping interval
 flip.setFlipInterval(1000);
 flip.startFlipping();
 }
we can stop the flipping by calling flip.stopFlipping(); method.
or we can set the flipper to flip autommatically when the activity starts
public void onCreate(Bundle savedInstanceState) {
 super.onCreate(savedInstanceState);
 setContentView(R.layout.main);

 btn=(Button)findViewById(R.id.btn);
 flip=(ViewFlipper)findViewById(R.id.flip);
 flip.setInAnimation(this,android.R.anim.fade_in);
 flip.setOutAnimation(this, android.R.anim.fade_out);
 flip.setFlipInterval(1000);
 flip.setAutoStart(true);

 }
Monday, April 18, 2016
Spinner View Android Beginner Dev Tutorial
This is again another very simple tutorial on using a Spinner View provided by Android SDK. A spinner is supposed to be a view that displays one child at a time (Whatever that means).
This example is very similar to the previous one on AutoCompleteTextView.
Jumping right into the code, here is the layout xml file:
<Spinner
android:id="@+id/Spinner01"
android:layout_width="wrap_content"
android:layout_height="wrap_content"
android:drawSelectorOnTop = "true"></Spinner>
Nothing special. It just consists of one element.
Now in the main activity, I create an array of android books:
String[] androidBooks =
{
"Hello, Android - Ed Burnette",
"Professional Android 2 App Dev - Reto Meier",
"Unlocking Android - Frank Ableson",
"Android App Development - Blake Meike",
"Pro Android 2 - Dave MacLean",
"Beginning Android 2 - Mark Murphy",
"Android Programming Tutorials - Mark Murphy",
"Android Wireless App Development - Lauren Darcey",
"Pro Android Games - Vladimir Silva",
};
Then in the onCreate() method, I create an ArrayAdapter that I can pass to this Spinner as the data Source.
ArrayAdapter<String> adapter =
new ArrayAdapter<String> (this,
android.R.layout.simple_spinner_item,androidBooks);
Then, I get a handle to the Spinner, and set the ArrayAdapter to it
sp = (Spinner)findViewById(R.id.Spinner01);
sp.setAdapter(adapter);
Now, on selecting one of the items in the spinner, I want to be able to toast a message on the book that was selected. It is done as follows:
sp.setOnItemSelectedListener(new OnItemSelectedListener() {
@Override
public void onItemSelected(AdapterView<?> arg0, View arg1, int arg2, long arg3) {
int item = sp.getSelectedItemPosition();
Toast.makeText(getBaseContext(),
"You have selected the book: " + androidBooks[item],
Toast.LENGTH_SHORT).show();
}
@Override
public void onNothingSelected(AdapterView<?> arg0) {
}
});
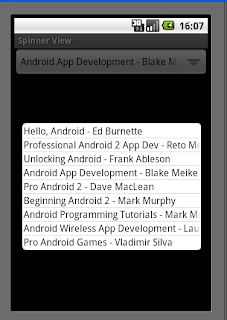 That is it. Now execute and see it work. Here is how it would look:
The example code can be downloaded here.
Read More..
This example is very similar to the previous one on AutoCompleteTextView.
Jumping right into the code, here is the layout xml file:
<Spinner
android:id="@+id/Spinner01"
android:layout_width="wrap_content"
android:layout_height="wrap_content"
android:drawSelectorOnTop = "true"></Spinner>
Nothing special. It just consists of one element.
Now in the main activity, I create an array of android books:
String[] androidBooks =
{
"Hello, Android - Ed Burnette",
"Professional Android 2 App Dev - Reto Meier",
"Unlocking Android - Frank Ableson",
"Android App Development - Blake Meike",
"Pro Android 2 - Dave MacLean",
"Beginning Android 2 - Mark Murphy",
"Android Programming Tutorials - Mark Murphy",
"Android Wireless App Development - Lauren Darcey",
"Pro Android Games - Vladimir Silva",
};
Then in the onCreate() method, I create an ArrayAdapter that I can pass to this Spinner as the data Source.
ArrayAdapter<String> adapter =
new ArrayAdapter<String> (this,
android.R.layout.simple_spinner_item,androidBooks);
Then, I get a handle to the Spinner, and set the ArrayAdapter to it
sp = (Spinner)findViewById(R.id.Spinner01);
sp.setAdapter(adapter);
Now, on selecting one of the items in the spinner, I want to be able to toast a message on the book that was selected. It is done as follows:
sp.setOnItemSelectedListener(new OnItemSelectedListener() {
@Override
public void onItemSelected(AdapterView<?> arg0, View arg1, int arg2, long arg3) {
int item = sp.getSelectedItemPosition();
Toast.makeText(getBaseContext(),
"You have selected the book: " + androidBooks[item],
Toast.LENGTH_SHORT).show();
}
@Override
public void onNothingSelected(AdapterView<?> arg0) {
}
});
The example code can be downloaded here.
Saturday, April 16, 2016
Android Developers Backstage Episode 8 Volley
In this episode, the second in a bizarrely and completely unplanned series on Play Store technology, Tor Norbye and Chet Haase are joined by Ficus Kirkpatrick from the Play Store team (and from many other Android projects from the early days). Listen in to hear what Volley is for and how you can use it to simplify your network requests and bitmap download/caching code.
Relevant links:
Volley: https://android.googlesource.com/platform/frameworks/volley/
Volley email list: https://groups.google.com/forum/#!forum/volley-users
Gson adapter for Volley: https://gist.github.com/ficusk/5474673
Subscribe to the podcast at http://feeds.feedburner.com/blogspot/AndroidDevelopersBackstage?.
Or download directly at http://storage.googleapis.com/androiddevelopers/android_developers_backstage/Android%20Developers%20Backstage%20Ep%208%20Volley.mp3
Saturday, March 26, 2016
Auto Complete Text View Android Beginner Dev Tutorial
This is a very simple tutorial on using Auto Complete Text View provided by Android SDK.
It consists of a single text box which can show suggestions based on a list of data that I provide as a source for this field. Just like Google Suggest, this also shows the nearest matches to the string that is being input by the end user.
So, here is the layout xml file:
<AutoCompleteTextView
android:id="@+id/AndroidBooks"
android:layout_width="fill_parent"
android:layout_height="wrap_content"></AutoCompleteTextView>
Nothing special. It just consists of one element.
Now in the main activity, I create an array of android books:
String[] androidBooks =
{
"Hello, Android - Ed Burnette",
"Professional Android 2 App Dev - Reto Meier",
"Unlocking Android - Frank Ableson",
"Android App Development - Blake Meike",
"Pro Android 2 - Dave MacLean",
"Beginning Android 2 - Mark Murphy",
"Android Programming Tutorials - Mark Murphy",
"Android Wireless App Development - Lauren Darcey",
"Pro Android Games - Vladimir Silva",
};
Then in the onCreate(..) method, I create an ArrayAdapter that I can pass to this AutoCompleteTextView as the data Source.
ArrayAdapter<String> adapter = new ArrayAdapter<String>(this,android.R.layout.simple_dropdown_item_1line,androidBooks);
Then, I get a handle to the AutocompleteTextView, and set the arrayAdapter to it along with the Threshold. The Threshold defines the number of charaters a user should type before the suggestions start showing up.
AutoCompleteTextView acTextView = (AutoCompleteTextView)findViewById(R.id.AndroidBooks);
acTextView.setThreshold(3);
acTextView.setAdapter(adapter);
That is it. Now execute and see it work.
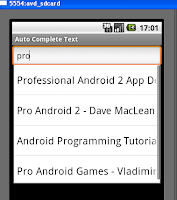 This is the way it would look:
The example code can be downloaded here.
Read More..
It consists of a single text box which can show suggestions based on a list of data that I provide as a source for this field. Just like Google Suggest, this also shows the nearest matches to the string that is being input by the end user.
So, here is the layout xml file:
<AutoCompleteTextView
android:id="@+id/AndroidBooks"
android:layout_width="fill_parent"
android:layout_height="wrap_content"></AutoCompleteTextView>
Nothing special. It just consists of one element.
Now in the main activity, I create an array of android books:
String[] androidBooks =
{
"Hello, Android - Ed Burnette",
"Professional Android 2 App Dev - Reto Meier",
"Unlocking Android - Frank Ableson",
"Android App Development - Blake Meike",
"Pro Android 2 - Dave MacLean",
"Beginning Android 2 - Mark Murphy",
"Android Programming Tutorials - Mark Murphy",
"Android Wireless App Development - Lauren Darcey",
"Pro Android Games - Vladimir Silva",
};
Then in the onCreate(..) method, I create an ArrayAdapter that I can pass to this AutoCompleteTextView as the data Source.
ArrayAdapter<String> adapter = new ArrayAdapter<String>(this,android.R.layout.simple_dropdown_item_1line,androidBooks);
Then, I get a handle to the AutocompleteTextView, and set the arrayAdapter to it along with the Threshold. The Threshold defines the number of charaters a user should type before the suggestions start showing up.
AutoCompleteTextView acTextView = (AutoCompleteTextView)findViewById(R.id.AndroidBooks);
acTextView.setThreshold(3);
acTextView.setAdapter(adapter);
That is it. Now execute and see it work.
The example code can be downloaded here.
Friday, March 11, 2016
Contacts API 2 0 and above Android Developer Tutorial
Starting from Android 2.0 (API Level 5), the Android platform provides an improved Contacts API for managing and integrating contacts from multiple accounts and from other data sources. To handle overlapping data from multiple sources, the contacts content provider aggregates similar contacts and presents them to users as a single entity. This article describes how to use the new API to manage (insert, update, delete, view) contacts.
The new Contacts API is defined in the
android.provider.ContactsContract and related classes. The older API is still supported, although deprecated. We need to understand the underlying structure of storage to better manipulate the contacts. We have three distinct types of tables – Contacts, Raw Contacts and Data.
All data related to a contact is stored in this generic data table with each row telling what is the data it stores through its MIME type. So we could have a Phone.CONTENT_ITEM_TYPE as the MIME type of the data row, it contains Phone data. Similarly, if we have Email.CONTENT_ITEM_TYPE as the row’s MIME type, then it stores email data. Like this lot of data rows are associated with a single Raw Contact.
Each Raw Contact refers to a specific contact’s data coming from one single source – say, you gmail account or your office Microsoft account.
The Contact is the topmost in the hierarchy which aggregates similar looking data from various sources into one single contact – a very handy feature when you have redundant data coming about the same contact from you various accounts – like a facebook account, orkut account, yahoo account and goggle account. So the hierarchy looks like this:

So, when we want to insert a new contact, we always insert a Raw Contact. When we want to update an existing contact, we most often deal with the data tables which are accessible through a series of CommonDataKind classes. Because this would be to update particular types of data like phone or email.
Coming to the example:
I create an activity with four buttons to View, Add, Modify and Delete Contacts.
Button view = (Button)findViewById(R.id.viewButton);
Button add = (Button)findViewById(R.id.createButton);
Button modify = (Button)findViewById(R.id.updateButton);
Button delete = (Button)findViewById(R.id.deleteButton);
view.setOnClickListener(new OnClickListener() {
public void onClick(View v){
displayContacts();
Log.i("NativeContentProvider", "Completed Displaying Contact list");
}
});
On the click of each of the buttons I invoke their respective methods: like displayContacts(), createContact(), updatecContact() and deleteContact(). We will now see each of these methods.

displayContacts() is pretty straightforward. Access to each of the tables mentioned above is through a content URI. I use the topmost level ‘Contacts’ URI to iterate through all the existing contacts and display their names and phone numbers (Toast them).
We know Contacts is a ContentProvider and hence we need to query through a ContentResolver which returns all the data of the contacts.
private voiddisplayContacts() {
ContentResolver cr = getContentResolver();
Cursor cur = cr.query(ContactsContract.Contacts.CONTENT_URI,
null, null, null, null);
if (cur.getCount() > 0) {
while (cur.moveToNext()) {
String id = cur.getString(cur.getColumnIndex(ContactsContract.Contacts._ID));
String name = cur.getString(cur.getColumnIndex(ContactsContract.Contacts.DISPLAY_NAME));
if (Integer.parseInt(cur.getString(
cur.getColumnIndex(ContactsContract.Contacts.HAS_PHONE_NUMBER))) > 0) {
Cursor pCur = cr.query(
ContactsContract.CommonDataKinds.Phone.CONTENT_URI,
null,
ContactsContract.CommonDataKinds.Phone.CONTACT_ID +" = ?",
new String[]{id}, null);
while (pCur.moveToNext()) {
String phoneNo = pCur.getString(pCur.getColumnIndex(ContactsContract.CommonDataKinds.Phone.NUMBER));
Toast.makeText(NativeContentProvider.this, "Name: " + name + ", Phone No: " + phoneNo, Toast.LENGTH_SHORT).show();
}
pCur.close();
}
}
}
}
I will try to briefly explain the above method. Line 1 gets a handle to the ContentResolver. Line 2 queries the Contacts URI (ContactsContract.Contacts.CONTENT_URI ) without any mention of the specific columns or “where” clause of an SQL query. Notice all the 4 parameters are null. This means that we are not making any conditional query into the contacts table and hence all data is returned into the cursor.
Next, I check that the cursor is not empty and iterate through the cursor data. I retrieve the _ID and DISPLAY_NAME from the Contacts and then, I check for the flag if the contact has a phone number. This information is available in contacts table itself. But the Phone number details are in the data tables. Hence after checking for the flag, I query the CommonDataKings.Phone.CONTENT_URI for the phone data of that specific ID. From this new cursor named pCur, I retrieve the Phone Number. If there are multiple phone number for one contact, all of them will be retrieved and toasted one after another.
Now, let us see how to create or insert a new contact.
In the createContact() method which is called when you click on the “Add Contact” button, I first query to see if the hardcoded name “Sample Name” already exists. If so, I toast a message stating the same. If not, then I get into actually inserting the name along with a phone number. The first part of the check you can view in the complete source code available for download. Only the second part of inserting a contact is explained here. For this, we need to use a ContentResolveralways.
A ContentResolverprovides an applyBatch(…) method which takes an array of ContentProviderOperation classes as a parameter. All the data built into the ContentProviderOperations are committed or inserted into the ContentProvider that we are working on. IN this case, the ContentProvider we are working on are Contacts and the authority associated with the same is ContactsContract.AUTHORITY
Here is the code for the same:
ArrayList<ContentProviderOperation> ops = newArrayList<ContentProviderOperation>();
ops.add(ContentProviderOperation.newInsert(ContactsContract.RawContacts.CONTENT_URI)
.withValue(ContactsContract.RawContacts.ACCOUNT_TYPE, "accountname@gmail.com")
Thursday, March 10, 2016
Context Menu Android Developer Tutorial
This is a follow up to the Options Menu Tutorial shared earlier.
To recap, the Context Menu is a floating list of menu items that appears when a user touches and holds a particular item displayed in the view, which has a menu associated with it.
Going straight to the example, first I create a ListViewwith names of pens displayed. When one presses and holds one of the names for a long time, the context menu appears as shown here:

And when you click on any of the context menu shown above, the screen that appears is:
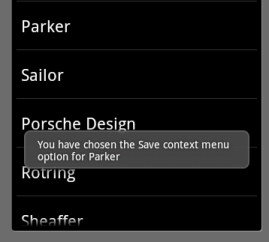
Let’s go to the code.
First, the mundane step of creating a Listview(you can see the ListView tutorial for more explanation on this).
I create a class ShowContextMenuextending the ListActivity. In its OnCreate(…) method, I associate the Listview array with the ListAdapater as shown here:
public class ShowContextMenu extends ListActivity {
/** Called when the activity is first created. */
@Override
public voidonCreate(Bundle savedInstanceState) {
super.onCreate(savedInstanceState);
setListAdapter(new ArrayAdapter<String>(this,
android.R.layout.simple_list_item_1, getResources().getStringArray(R.array.names)));
…
}
Note that instead of hard-coding the list items as string array within the class, I have followed the best practice of externalizing the strings into a strings.xml resource class. Hence I use getResources().getStringArray(R.array.names) to retrieve the array of pen names that I want to display in the List. The strings.xml file in the value folder has this entry:
<string-array name="names">
<item>MONT Blanc</item>
<item>Gucci</item>
<item>Parker</item>
<item>Sailor</item>
<item>Porsche Design</item>
<item>Rotring</item>
<item>Sheaffer</item>
<item>Waterman</item>
</string-array>
Once this Listview has been created, now we want to associate a ContextMenu with each of the rows in the Listview Item. i.e. is a user were to long-press one of the items, a menu should appear. For this we add the following line as well in the onCreate(..) method.
registerForContextMenu(getListView());
But how do we create the ContextMenu? Whenever the long-press happens, the onCreateContextMenu(…) method is invoked. So, we need to override this method as shown below:
public voidonCreateContextMenu(ContextMenu menu, View v, ContextMenuInfo menuInfo) {
super.onCreateContextMenu(menu, v, menuInfo);
MenuInflater inflater = getMenuInflater();
inflater.inflate(R.menu.context_menu, menu);
}
Here again, just as in Options Menu tutorial, I use a MenuInflater to create the context menu rather than do it programmatically. This is certainly a best practice of keeping the concerns separated. The View and the programming logic are kept separate as meant to be in Android Programming. The context menu consists of 4 items – Edit, Save, Delete, View. So, here is how it is defined in the context_menu.xml in the res/menu folder:
<menu
>="http://schemas.android.com/apk/res/android">
<item android:id="@+id/edit"
android:title="@string/edit" />
<item android:id="@+id/save"
android:title="@string/save" />
<item android:id="@+id/delete"
android:title="@string/delete" />
<item android:id="@+id/view"
android:title="@string/view" />
</menu>
I have an id that is associated with each of the menu items that uniquely identifies the menu item selected. And I have a String associated with it which is what is displayed on the Menu.
Now that the context menu is created, how to handle when the menu item is clicked? For this we need to override the onContextItemSelected(…) method as shown below;
Monday, February 8, 2016
Gallery View Android Developer Tutorial
Continuing on the Views, I have taken up the Gallery View that helps in showing Images as in a gallery. As per the android documentation, this is the definition: “A Gallery is a View commonly used to display items in a horizontally scrolling list that locks the current selection at the center.”
For this the layout xml in this case, the main.xml will have a ‘Gallery’ element as shown below:
<Gallery
android_id="@+id/Gallery01"
android_layout_width="fill_parent"
android_layout_height="wrap_content"></Gallery>
<ImageView android_id="@+id/ImageView01"
android_layout_width="wrap_content"
android_layout_height="wrap_content"></ImageView>

Now, I create a GalleryView Activity. To view a set of images of Antartica, I have created small sized images of antartica and stored them in the res/drawable-ldpi folder starting form antartica1.png to antartica10.png.
I create an array of these resources/images in my activity with the following code:
Integer[] pics = {
R.drawable.antartica1,
R.drawable.antartica2,
R.drawable.antartica3,
R.drawable.antartica4,
R.drawable.antartica5,
R.drawable.antartica6,
R.drawable.antartica7,
R.drawable.antartica8,
R.drawable.antartica9,
R.drawable.antartica10
};
As we have seen with all the other views so far, we need to have an adapter that associates the view with the data. Here the view is Gallery and the data is the above mentioned 10 images. An Adapter plays the role of linking the two as shown below:
Gallery ga = (Gallery)findViewById(R.id.Gallery01);
ga.setAdapter(new ImageAdapter(this));
However, we do not have a readymade implementation of the ImageAdapter. We have to create our own implementation of the same by extending the BaseAdapter class. This is the core of the code in this example. The moment we extend the BaseAdapter, we have to override 4 methods. They are getCount(), getItem(), getItemId() and getView().
Before we go to each of them, let us see the constructor of the ImageAdpater:
public class ImageAdapter extends BaseAdapter {
private Context ctx;
int imageBackground;
public ImageAdapter(Context c) {
ctx = c;
TypedArray ta = obtainStyledAttributes(R.styleable.Gallery1);
imageBackground = ta.getResourceId(R.styleable.Gallery1_android_galleryItemBackground, 1);
ta.recycle();
}
…
}
It takes the context that is passed to the constructor. We need to examine this code a little. First, we can define our own resources or attributes in an XML file. Those attributes can be retrieved through the method obtainStyledAttributes. This is a method on the Context object. The returned value needs to be stored in a TypedArray object. A TypedArray is nothing but a container for an array of values that are returned by obtainStyledAttributes.
So, in my example, I have created an xml file by name attributes.xml in the res/values folder with the following content:
<resources>
<declare-styleable name="Gallery1">
<attr name="android:galleryItemBackground"/>
</declare-styleable>
</resources>
Here Gallery1 is a custom name for a style defined by us. In this style, we are trying to say what should be the background of our images. For that we are using a pre-defined backgournd in R.attr class as galleryItemBackground.
So, this is accessed in the ImageAdapter contructor through the line
ta.getResourceId(R.styleable.Gallery1_android_galleryItemBackground, 1);
ta.recycle();
The number 1 is to say that it is the first element in the attributes.xml file under the styelable Gallery1.
The rest of the over ridden methods are simple:
@Override
public int getCount() {
return pics.length;
}
@Override
public Object getItem(int arg0) {
return arg0;
}
@Override
public long getItemId(int arg0) {
return arg0;
}
@Override
public View getView(int arg0, View arg1, ViewGroup arg2) {
ImageView iv = new ImageView(ctx);
iv.setImageResource(pics[arg0]);
iv.setScaleType(ImageView.ScaleType.FIT_XY);
iv.setLayoutParams(new Gallery.LayoutParams(150,120));
iv.setBackgroundResource(imageBackground);
return iv;
}
The getView actually returns a View object when called. Here I have overridden it to return a ImageView object with the selected image inside it alosn with some scale, layout paramaters and the image background set.
Finally in the onCreate() method of the activity I have captured the onClick event on a Gallery item and within that I have toasted a message as well as displayed the image in a bigger manner below the gallery:
ga.setOnItemClickListener(new OnItemClickListener() {
@Override
public void onItemClick(AdapterView<?> arg0, View arg1, int arg2, long arg3) {
Toast.makeText(getBaseContext(), "You have selected picture " + (arg2+1) + " of Antartica",
Toast.LENGTH_SHORT).show();
imageView.setImageResource(pics[arg2]);
}
});
That is it. You may download the complete code from here.
Read More..
For this the layout xml in this case, the main.xml will have a ‘Gallery’ element as shown below:
<Gallery
android_id="@+id/Gallery01"
android_layout_width="fill_parent"
android_layout_height="wrap_content"></Gallery>
<ImageView android_id="@+id/ImageView01"
android_layout_width="wrap_content"
android_layout_height="wrap_content"></ImageView>
It also has an ImageView element which is used to show the selected Image in a larger ImageView. Here is how it would look when executed.
I create an array of these resources/images in my activity with the following code:
Integer[] pics = {
R.drawable.antartica1,
R.drawable.antartica2,
R.drawable.antartica3,
R.drawable.antartica4,
R.drawable.antartica5,
R.drawable.antartica6,
R.drawable.antartica7,
R.drawable.antartica8,
R.drawable.antartica9,
R.drawable.antartica10
};
As we have seen with all the other views so far, we need to have an adapter that associates the view with the data. Here the view is Gallery and the data is the above mentioned 10 images. An Adapter plays the role of linking the two as shown below:
Gallery ga = (Gallery)findViewById(R.id.Gallery01);
ga.setAdapter(new ImageAdapter(this));
However, we do not have a readymade implementation of the ImageAdapter. We have to create our own implementation of the same by extending the BaseAdapter class. This is the core of the code in this example. The moment we extend the BaseAdapter, we have to override 4 methods. They are getCount(), getItem(), getItemId() and getView().
Before we go to each of them, let us see the constructor of the ImageAdpater:
public class ImageAdapter extends BaseAdapter {
private Context ctx;
int imageBackground;
public ImageAdapter(Context c) {
ctx = c;
TypedArray ta = obtainStyledAttributes(R.styleable.Gallery1);
imageBackground = ta.getResourceId(R.styleable.Gallery1_android_galleryItemBackground, 1);
ta.recycle();
}
…
}
It takes the context that is passed to the constructor. We need to examine this code a little. First, we can define our own resources or attributes in an XML file. Those attributes can be retrieved through the method obtainStyledAttributes. This is a method on the Context object. The returned value needs to be stored in a TypedArray object. A TypedArray is nothing but a container for an array of values that are returned by obtainStyledAttributes.
So, in my example, I have created an xml file by name attributes.xml in the res/values folder with the following content:
<resources>
<declare-styleable name="Gallery1">
<attr name="android:galleryItemBackground"/>
</declare-styleable>
</resources>
Here Gallery1 is a custom name for a style defined by us. In this style, we are trying to say what should be the background of our images. For that we are using a pre-defined backgournd in R.attr class as galleryItemBackground.
So, this is accessed in the ImageAdapter contructor through the line
ta.getResourceId(R.styleable.Gallery1_android_galleryItemBackground, 1);
ta.recycle();
The number 1 is to say that it is the first element in the attributes.xml file under the styelable Gallery1.
The rest of the over ridden methods are simple:
@Override
public int getCount() {
return pics.length;
}
@Override
public Object getItem(int arg0) {
return arg0;
}
@Override
public long getItemId(int arg0) {
return arg0;
}
@Override
public View getView(int arg0, View arg1, ViewGroup arg2) {
ImageView iv = new ImageView(ctx);
iv.setImageResource(pics[arg0]);
iv.setScaleType(ImageView.ScaleType.FIT_XY);
iv.setLayoutParams(new Gallery.LayoutParams(150,120));
iv.setBackgroundResource(imageBackground);
return iv;
}
The getView actually returns a View object when called. Here I have overridden it to return a ImageView object with the selected image inside it alosn with some scale, layout paramaters and the image background set.
Finally in the onCreate() method of the activity I have captured the onClick event on a Gallery item and within that I have toasted a message as well as displayed the image in a bigger manner below the gallery:
ga.setOnItemClickListener(new OnItemClickListener() {
@Override
public void onItemClick(AdapterView<?> arg0, View arg1, int arg2, long arg3) {
Toast.makeText(getBaseContext(), "You have selected picture " + (arg2+1) + " of Antartica",
Toast.LENGTH_SHORT).show();
imageView.setImageResource(pics[arg2]);
}
});
That is it. You may download the complete code from here.

