Pages

Showing posts with label intent. Show all posts

Friday, May 13, 2016

Android Developers Blog Can I use this Intent

We all know that the loose coupling provided by Android through intents is one of its most powerful features. It makes it possible for us to mix and match the use of activities between various applications as though they all belong to one.

However, when I want to invoke another application that has published an intent filter, I cannot always assume that the other application is available on the phone. So, I need to check its availability and then only enable the feature to call it.

This is very well explained in the link: Android Developers Blog: Can I use this Intent?

Read More..

Monday, April 18, 2016

Spinner View Android Beginner Dev Tutorial

This is again another very simple tutorial on using a Spinner View provided by Android SDK. A spinner is supposed to be a view that displays one child at a time (Whatever that means).


This example is very similar to the previous one on AutoCompleteTextView.

Jumping right into the code, here is the layout xml file:

<Spinner
android:id="@+id/Spinner01"
android:layout_width="wrap_content"
android:layout_height="wrap_content"
android:drawSelectorOnTop = "true"></Spinner>


Nothing special. It just consists of one element.

Now in the main activity, I create an array of android books:

String[] androidBooks =
{
"Hello, Android - Ed Burnette",
"Professional Android 2 App Dev - Reto Meier",
"Unlocking Android - Frank Ableson",
"Android App Development - Blake Meike",
"Pro Android 2 - Dave MacLean",
"Beginning Android 2 - Mark Murphy",
"Android Programming Tutorials - Mark Murphy",
"Android Wireless App Development - Lauren Darcey",
"Pro Android Games - Vladimir Silva",
};

Then in the onCreate() method, I create an ArrayAdapter that I can pass to this Spinner as the data Source.

ArrayAdapter<String> adapter =
        new ArrayAdapter<String> (this,
        android.R.layout.simple_spinner_item,androidBooks);

Then, I get a handle to the Spinner, and set the ArrayAdapter to it

sp = (Spinner)findViewById(R.id.Spinner01);
sp.setAdapter(adapter);

Now, on selecting one of the items in the spinner, I want to be able to toast a message on the book that was selected. It is done as follows:

sp.setOnItemSelectedListener(new OnItemSelectedListener() {
    @Override
    public void onItemSelected(AdapterView<?> arg0, View arg1, int arg2, long arg3) {
        int item = sp.getSelectedItemPosition();
        Toast.makeText(getBaseContext(),
            "You have selected the book: " + androidBooks[item],
            Toast.LENGTH_SHORT).show();
    }


    @Override
    public void onNothingSelected(AdapterView<?> arg0) {
    }
});

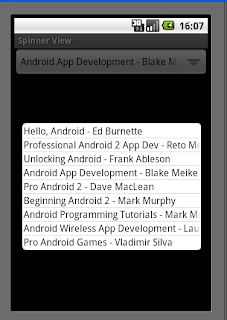
That is it. Now execute and see it work. Here is how it would look:

The example code can be downloaded here.
Read More..

Saturday, April 9, 2016

al"" sty"

the,chord,android,sdk,starter,program,part,1
Read More..

Saturday, March 26, 2016

Auto Complete Text View Android Beginner Dev Tutorial

This is a very simple tutorial on using Auto Complete Text View provided by Android SDK.


It consists of a single text box which can show suggestions based on a list of data that I provide as a source for this field. Just like Google Suggest, this also shows the nearest matches to the string that is being input by the end user.

So, here is the layout xml file:

<AutoCompleteTextView
android:id="@+id/AndroidBooks"
android:layout_width="fill_parent"
android:layout_height="wrap_content"></AutoCompleteTextView>

Nothing special. It just consists of one element.

Now in the main activity, I create an array of android books:

String[] androidBooks =
{
"Hello, Android - Ed Burnette",
"Professional Android 2 App Dev - Reto Meier",
"Unlocking Android - Frank Ableson",
"Android App Development - Blake Meike",
"Pro Android 2 - Dave MacLean",
"Beginning Android 2 - Mark Murphy",
"Android Programming Tutorials - Mark Murphy",
"Android Wireless App Development - Lauren Darcey",
"Pro Android Games - Vladimir Silva",
};

Then in the onCreate(..) method, I create an ArrayAdapter that I can pass to this AutoCompleteTextView as the data Source.

ArrayAdapter<String> adapter = new ArrayAdapter<String>(this,android.R.layout.simple_dropdown_item_1line,androidBooks);

Then, I get a handle to the AutocompleteTextView, and set the arrayAdapter to it along with the Threshold. The Threshold defines the number of charaters a user should type before the suggestions start showing up.

AutoCompleteTextView acTextView = (AutoCompleteTextView)findViewById(R.id.AndroidBooks);
acTextView.setThreshold(3);
acTextView.setAdapter(adapter);

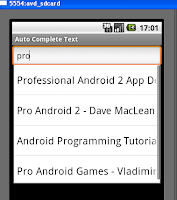
That is it. Now execute and see it work. 
This is the way it would look:

The example code can be downloaded here.
Read More..

Sunday, March 20, 2016

Android Story From x cube Labs

The-Andriod-Story

Infographic by Android Developers at [x]cubelabs
Read More..

Sunday, March 13, 2016

Explicit Intent Android Tutorial for Beginners Part 2

Having introduced you to the basic anatomy of an android application in the Part 1 of the series, I would like to show you an example where communication between 2 activities happens through an intent.


However, just one more detail to be introduced as promised and that is -
There are 2 types of intents that Android understands.
1. Explicit Intent
2. Implicit Intent


In an Explicit intent, you actually specify the activity that is required to respond to the intent. In other words, you explicitly designate the target component. This is typically used for application internal messages.


In an Implicit intent (the main power of the android design), you just declare an intent and leave it to the platform to find an activity that can respond to the intent. Here, you do not declare the target component and hence is typically used for activating components of other applications seamlessly
Note: Here for simplicity sake I tell an activity responds to an intent, it could as well be other types of components.
Now I will jump into the example which you can download from here:


This example has 2 activities:
1. InvokingActivity
2. InvokedActivity
The InvokingActivity has a button "Invoke Next Activity" which when clicked explicitly calls the "InvokedActivity" class.
The relevant part of the code is here:

        Button invokingButton = (Button)findViewById(R.id.invokebutton);
        invokingButton.setOnClickListener(new OnClickListener() {


public void onClick(View v) {
        
Intent explicitIntent = new Intent(InvokingActivity.this,InvokedActivity.class);
         startActivity(explicitIntent);
        
}
        });

As explained in part 1 of the series, this is very much like an API call with compile time binding.
NOTE: The layout for InvokingActivity is defined in main.xml and for InvokedActivity in InvokedActivity.xml. The downloadable example can be opened in Eclipse Ganymede as an android project and can be executed.
In the next part of the series, we will see how to work with implicit intents which also needs us to understand intent-filters
Read More..

Thursday, March 3, 2016

Implicit Intent Android Tutorial for Beginners Part 3


We have seen in Part 2 how to use Explicit Intents to invoke activities through a very simple example. Now, we will move on to a more interesting concept of Implicit Intents and Intent Filters. 

This requires a little of theoretical understanding before we move on to an example. 

As described earlier, an implicit intent does not name a target component that should act upon the intent. I 
also said that the android platform resolves as to which component is best suited to respond to an Implicit Intent. How does this happen?

Basically, an Intent object has the following information (among other things like Component name, extras and flags) which is of interest for implicit intents:
  • Action
  • Category
  • Data
So, the android platform compares these 3 (action, category and data) to something called "Intent Filters" that are declared by probable target components who are willing to accept Implicit Intent calls.
i.e. Intent Filters are the way of any component to advertise its own capabilities to the Android system. This is done declaratively in the AndroidManifest.xml file.

So here are some important points to remember:
  1. Implicit Intents do not specify a target component
  2. Components willing to receive implicit intents have to declare their ability to handle a specific intent by declaring intent filters
  3. A component can declare any number of Intent Filters
  4. There can be more than one component that declares the same Intent Filters and hence can respond to the same implicit intent. In that case the user is presented both the component options and he can choose which one he wants to continue with
  5. You can set priorities for the intent filters to ensure the order of responses.
There are 3 tests conducted in order to match an intent with intent filters:
  1. Action Test
  2. Category Test
  3. Data Test
For more details about them, you may visit the Android developer documentation here.

Finally we shall look at declaring an implicit intent in one activity which will invoke one of the native activities of the platform by matching the intent filters declared by the same.

The complete code for a very simple implicit intent example that has been described in this article is available for download here.

The InvokeImplicitIntent Activity creates an implicit intent object "contacts". This intent objects component is not set. However, the action is set to "android.content.intent.ACTION_VIEW" and the datas URI is set to "People.CONTENT_URI". 

Such an intent matches with the intent filter declared by the view contacts native activity.
So, when you run this application, it displays the native UI for viewing the existing contacts on the phone!

Here is the relevant piece of code for the same:
           Button viewContacts = (Button)findViewById(R.id.ViewContacts);
        
            viewContacts.setOnClickListener(new OnClickListener() {
            
             public void onClick(View v) {
              Intent contacts = new Intent();
              contacts.setAction(android.content.Intent.ACTION_VIEW);
              contacts.setData(People.CONTENT_URI);
              startActivity(contacts);
             }
            });


In this manner many of the native applications can be seamlessly invoked as one of the activities in our applications through implicit intents.

---------------------------------------------------------------------------------------------------------
Updated on 31st March 2010:
The above example uses Android SDK 1.5.
From SDK 1.6 and above, the Contact.People class has been deprecated and we need to use the ContactsContract class. So the line in code
       contacts.setData(People.CONTENT_URI);

has to be replaced by

       contacts.setData(ContactsContract.Contacts.CONTENT_URI);

Here is the complete source code that has been tested with Android SDK 2.1
Read More..

Monday, February 22, 2016

Android Intents Part3 Intent Filters

Android components like activities can also serve implicit intents. but to do so they have to filter all implicit intents in order to serve only the intents they desire to serve. this is done using intent filters.

Suppose you want to create an activity that acts as the default dialer activity. You must associate an intent filter with this activity in order to that this activity serve the dial intents only.

Lets demonstrate a simple example which is creating an application with one activity that we want to make it a dialer activity.

Create a new android project, create an activity and name it Dialer.

In the AndroidManifest.xml file of this application add the following to the Dialer activity:
<intent-filter android_priority="100" >
<action android_name="android.intent.action.DIAL" />
<category android_name="android.intent.category.DEFAULT" />
<data android_scheme="tel"/>
</intent-filter>
to become:
<activity android_name=".Dialer"
android_label="@string/app_name">
<intent-filter>
<action android_name="android.intent.action.MAIN" />
<category android_name="android.intent.category.LAUNCHER" />
</intent-filter>
<intent-filter android_priority="100" >
<action android_name="android.intent.action.DIAL" />
<category android_name="android.intent.category.DEFAULT" />
<data android_scheme="tel"/>
</intent-filter>
</activity>
Now what we have done is adding an intent filter to that activity. this intent filter has the following properties:
  1. Action: the type of implicit intents that this activity responds to. in our case it is the dial action. higher numbers represent higher priority.
  2. Priority: about the priority of that activity over other activities that respond to the same type of intents.
  3. Category: Implicit intents have built-in categories. in order that an implicit intent be captured by our activity, the implicit intent category must match our activity category.
  4. Data: adds data specification scheme to the intent filter.
So if any other application has the following module to launch the dialer:
Intent in=new Intent(Intent.ACTION_DIAL, Uri.parse("tel:000"));
startActivity(in);
The user will see the following dialog offering him/her the choice between the default dialer and our custom dialer.
Read More..