This is a follow up to the Options Menu Tutorial shared earlier.
To recap, the Context Menu is a floating list of menu items that appears when a user touches and holds a particular item displayed in the view, which has a menu associated with it.
Going straight to the example, first I create a ListViewwith names of pens displayed. When one presses and holds one of the names for a long time, the context menu appears as shown here:

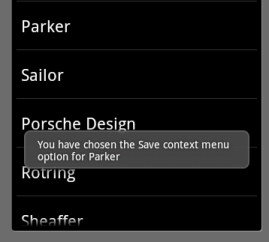
And when you click on any of the context menu shown above, the screen that appears is:

Let’s go to the code.
First, the mundane step of creating a Listview(you can see the ListView tutorial for more explanation on this).
I create a class ShowContextMenuextending the ListActivity. In its OnCreate(…) method, I associate the Listview array with the ListAdapater as shown here:
public class ShowContextMenu extends ListActivity {
/** Called when the activity is first created. */
@Override
public voidonCreate(Bundle savedInstanceState) {
super.onCreate(savedInstanceState);
setListAdapter(new ArrayAdapter<String>(this,
android.R.layout.simple_list_item_1, getResources().getStringArray(R.array.names)));
…
}
Note that instead of hard-coding the list items as string array within the class, I have followed the best practice of externalizing the strings into a strings.xml resource class. Hence I use getResources().getStringArray(R.array.names) to retrieve the array of pen names that I want to display in the List. The strings.xml file in the value folder has this entry:
<string-array name="names">
<item>MONT Blanc</item>
<item>Gucci</item>
<item>Parker</item>
<item>Sailor</item>
<item>Porsche Design</item>
<item>Rotring</item>
<item>Sheaffer</item>
<item>Waterman</item>
</string-array>
Once this Listview has been created, now we want to associate a ContextMenu with each of the rows in the Listview Item. i.e. is a user were to long-press one of the items, a menu should appear. For this we add the following line as well in the onCreate(..) method.
registerForContextMenu(getListView());
But how do we create the ContextMenu? Whenever the long-press happens, the onCreateContextMenu(…) method is invoked. So, we need to override this method as shown below:
public voidonCreateContextMenu(ContextMenu menu, View v, ContextMenuInfo menuInfo) {
super.onCreateContextMenu(menu, v, menuInfo);
MenuInflater inflater = getMenuInflater();
inflater.inflate(R.menu.context_menu, menu);
}
Here again, just as in Options Menu tutorial, I use a MenuInflater to create the context menu rather than do it programmatically. This is certainly a best practice of keeping the concerns separated. The View and the programming logic are kept separate as meant to be in Android Programming. The context menu consists of 4 items – Edit, Save, Delete, View. So, here is how it is defined in the context_menu.xml in the res/menu folder:
<menu
>="http://schemas.android.com/apk/res/android">
<item android:id="@+id/edit"
android:title="@string/edit" />
<item android:id="@+id/save"
android:title="@string/save" />
<item android:id="@+id/delete"
android:title="@string/delete" />
<item android:id="@+id/view"
android:title="@string/view" />
</menu>
I have an id that is associated with each of the menu items that uniquely identifies the menu item selected. And I have a String associated with it which is what is displayed on the Menu.
Now that the context menu is created, how to handle when the menu item is clicked? For this we need to override the onContextItemSelected(…) method as shown below;
public boolean onContextItemSelected(MenuItem item) {
0 comments:
Post a Comment