Pages

Showing posts with label part. Show all posts

Saturday, May 14, 2016

Android Intents part 1

In this post we are going to explore the concept of intents in Android.

Intents are used by an application to interact with the phones hardware components or other applications, or to start a service or activity with a certain peice of data or to broadcast that an event has occurred.

Using Intents to launch phone activities:
we can use Intents to launch the phones basic activities such as the phone dialer, the browser or search.

these intents are called implicit intents cause you dont specify the activity you want to launch, rather Android determines the proper activity to launch based on the required action. also when the launched activity finisheds its work, the original activity has no information that the launched activity has finished its work

in this example we create an intent that performs a phone number dial action. we don not specify that we want the dialer activity to launch, rather we specify that we want to dial a number and Android launches the dialer activity to perform this action

consider this activity: consists of a TextView and a button to dial the number in the text view.

<?xml version="1.0" encoding="utf-8"?>
<LinearLayout
android_orientation="vertical"
android_layout_width="fill_parent"
android_layout_height="fill_parent"
>
<TextView
android_layout_width="fill_parent"
android_layout_height="wrap_content"
android_text="Enter the phone number"
/>
<EditText
android:layout_width="fill_parent"
android:layout_height="wrap_content"
android:id="@+id/txtNumber"
android:inputType="phone"
/>
<Button
android:layout_width="wrap_content"
android:layout_height="wrap_content"
android:text="Dial"
android:id="@+id/btnDial"
/>
</LinearLayout>


When you press the button the phone dialer launches and then you can call the number.
this is done using the following code
btnDial.setOnClickListener(new OnClickListener() {

public void onClick(View v) {
// TODO Auto-generated method stub

Intent dialIntent=new Intent(Intent.ACTION_DIAL,Uri.parse("tel:"+(txtNumber.getText()).toString()));

startActivity(dialIntent);
}
});

notice that the dialer has been launched but the user has to press the call button to make a call.


if you want the phone to dial the number autom atically you could have used this intent
Intent.ACTION_CALL
but this requires ading the following permission to the manifest file:
<uses-permission android_name="android.permission.CALL_PHONE">
and that was how to launch the phone activities using intents.
for a list of available phone actions, check this link
Read More..

Friday, May 13, 2016

Simple ListView Android Developer Tutorial Part 16

From exploring the various concepts related to fundamentals and to locations and maps, I would like to look at a few UI elements.


One of the simple views is a List View. In this post, I will explore a very simple list view using all the defaults provided by Android SDK and introduce you to a customized list view in the next blog article.

A List View, by name means being able to display a list of items in an order one below the other. For creating such a view, the first thing we have to do is extend the ‘ListActivity’ (android.app.ListActivity) instead of the normal Activity class.

So, here is how the class declaration should look:

public class MyListView extends ListActivity {
The ListActivity class provides a way of binding a source of data (an array or a cursor) to a ListView object through a ListAdapter.

In android, we all know that views are defined declaratively in XML files. It is the same here too. So, if we were to create our own custom ListView, we would have a declaration of this type:

<ListView android_id="@id/android:list"
android:layout_width="fill_parent"
android:layout_height="fill_parent"
android:background="#000fff"
android:layout_weight="2"
android:drawSelectorOnTop="false">
</ListView>

However, if no ListView is declared, the ListActivity picks up a default ListView which fills the screen. So, in our example we will not declare any list view.

There is one more thing we need to define and that is how each row in the list should show up. This again, there are some defaults available which have names such as simple_list_item_1, simple_list_item_2, and two_line_list_item. So, in our example, I do not declare the layout for the rows but I will be using one of the defaults provided. So, in effect, I have not declared any layout – I am using the default screen layout and row layout.

Now, that we have the layouts out of our way, what else do we need for a List View. Of course, the list of data that needs to be displayed. Just to keep it simple, I will use an array of data for the same. So, here it is:

static final String[] PENS = new String[]{
"MONT Blanc",
"Gucci",
"Parker",
"Sailor",
"Porsche Design",
"Rotring",
"Sheaffer",
"Waterman"
};

Now, how do I bind this data to the default views described earlier? This is aided by a ListAdapter interface hosted by the ListActivity class that we have extended.

We need to use the setListAdapter(..) method of the ListActivity class to bid the two (data and view). Android provides many implementations of the ListAdapter. We will use the simple ArrayAdapter.

What does the ArrayAdapter expect?

It expects the context object, the row layout and the data in an array.

So here it is:

setListAdapter(new ArrayAdapter<String>(this,
android.R.layout.simple_list_item_1, PENS));
With this we are done in creating the ListView.

I have added a small piece of code to show we can handle events on selecting an item in the list, by overriding the protected method shown below:

protected void onListItemClick(ListView l, View v, int position, long id) {
super.onListItemClick(l, v, position, id);
Object o = this.getListAdapter().getItem(position);
String pen = o.toString();
Toast.makeText(this, "You have chosen the pen: " + " " + pen, Toast.LENGTH_LONG).show();
}

This toasts a message with the item selected.

The complete code is downloadable here.

Read More..

Android Developers Blog Can I use this Intent

We all know that the loose coupling provided by Android through intents is one of its most powerful features. It makes it possible for us to mix and match the use of activities between various applications as though they all belong to one.

However, when I want to invoke another application that has published an intent filter, I cannot always assume that the other application is available on the phone. So, I need to check its availability and then only enable the feature to call it.

This is very well explained in the link: Android Developers Blog: Can I use this Intent?

Read More..

Tuesday, May 10, 2016

Android Developers Backstage Episode 11 ART pART 2 Trash Talk

In this continuation of the previous gripping and suspenseful episode known as Episode 10, Tor and Chet hear more from Anwar Ghuloum from the Android Runtime team. This time is all trash-talk. Tune in to hear more about garbage collection and how allocation and collection performance is much faster with ART (and, more interestingly, why its faster).

Subscribe to the podcast feed or download the audio file directly.

ARTicles:
Introducing ART: http://source.android.com/devices/tech/dalvik/art.html
Verifying App Behavior: http://developer.android.com/guide/practices/verifying-apps-art.html

Video:
The ART Runtime: https://www.youtube.com/watch?v=EBlTzQsUoOw

Other Resources:
Systrace: http://developer.android.com/tools/help/systrace.html

Tor: google.com/+TorNorbye
Chet: google.com/+ChetHaase
Read More..

Friday, May 6, 2016

Android Menus part 4 Alternative menus

Android offers a third type of menus: Alternative menus which allow multiple applications to use each other. An application menu can contain menu items that point to other applications that deal with a certain data type that is passed from the application by an intent.

This functionality is related to the concept of Content Providers which is in brief the ability of an application to expose its data (stored in a database or a file) by defining a MIME type to it and through a content URI to be accessed by any other application through this URI.

For example if an application name Employees has some data of employees stored within this application context, and another application wants to access this data; then Employees application should declare a content provider  to expose its data, with a MIME type:

vnd.android.cursor.item/mina.android.Employees so any other application can access the employees data by calling the Uri content://employees/All to access all employees or the Uri content://employees/1 to access a single employee instance (for example).

Back to our Alternative menus issue, suppose this Scenario: We have two applications:
  1. Application A: deals with the employees data.
  2. Application B: receives the content Uri of the employees and do some calculations on it.
Now we want to add an alternative menu item in an activity in Application A so that when clicked passes a URI of employees and launches an activity in Application B (that manipulates the employees data according to the URI received).

So to add the alternative menu item in the activity of Application A, we write the following in onCreateOptionsMenu method:
public boolean onCreateOptionsMenu(Menu menu) {

//adds a regular menu item
menu.add("Regular item");
//create the intent with the Uri of the employees content provider
Intent targetIntent=
new Intent(Intent.ACTION_VIEW, Uri.parse("content://employees/All"));
targetIntent.addCategory(Intent.CATEGORY_ALTERNATIVE);
menu.addIntentOptions(Menu.CATEGORY_ALTERNATIVE, //item group
Menu.CATEGORY_ALTERNATIVE, //item id
Menu.CATEGORY_ALTERNATIVE, //item order
this.getComponentName(), //our activity class name
null, //no specific menu items required
targetIntent, // the intent to handle
0, //no flags
null); //Optional array in which to place the menu
//items that were generated for each of
//the specifics that were requested

return true;
}
Heres what we did:
  • Create an intent with the desired action (Intent.ACTION_VIEW) on the specified content provider Uri (content://employees/All).
  • Call addIntentOptions method with the specified parameters.
The above code adds a menu item that launches all possible activities in all applications on the device that can deal with the action Intent.ACTION_VIEW on the Uri content://employees/All.

Now in Application B, if we want it to handle such an intent we have to do the following.

Define an activity in the application and specify in the AndroidManifest.xml file that this activity can handle the requests of the employees content provider like this:
<activity android_name=".ContentProvidersDemo" android_label="@string/app_name">

<intent-filter android_label="Access Employees">
<action android_name="android.intent.action.VIEW" />
<category android_name="android.intent.category.DEFAULT" />
<category android_name="android.intent.category.ALTERNATIVE" />
<data android_mimeType="vnd.android.cursor.item/mina.android.Employees" />
</intent-filter>
</activity>
The above IntentFilter means that this activity will respond t0 any implicit intent from any application with the following parameters:
  1. Action: Intent.ACTION_VIEW.
  2. Category: android.intent.category.ALTERNATIVE.
  3. Data of MIME type:vnd.android.cursor.item/mina.android.Employees.
So in Application A when you press on the menu button, youll see a menu like this:


When you press on the Access Employees menu item, the activity in Application B will be launched.


Read More..

Tuesday, May 3, 2016

Android Bluetooth Terminal


The post in my another blogspot show how to "Config Raspberry Pi to use HC-06 Bluetooth Module, as Serial Terminal".

My former post show how "Android communicate with Arduino + HC-06 Bluetooth Module" to link Android with other serial devices via bluetooth. Actually, it can communicate with Raspberry Pi + HC-06 also.

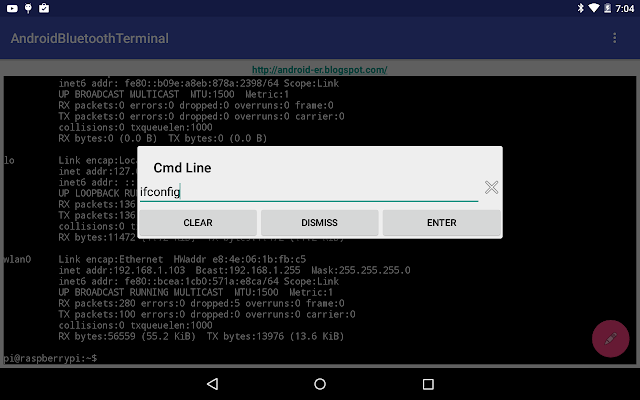
This example I re-code "Android communicate with Arduino + HC-06 Bluetooth Module" to make it work like a serial terminal to log-in Raspberry Pi via bluetooth.

- Prepare on Raspberry Pi 2, to config serial terminal work on 9600 baud, refer "Config Raspberry Pi to use HC-06 Bluetooth Module, as Serial Terminal".
-  The Android and HC-06 have to pair in advance.


Create a new project of Blank Activity in Android Studio,

layout/content_main.xml, its the main terminal screen.
<?xml version="1.0" encoding="utf-8"?>
<LinearLayout


android_layout_width="match_parent"
android_layout_height="match_parent"
android_padding="5dp"
android_orientation="vertical"
app_layout_behavior="@string/appbar_scrolling_view_behavior"
tools_showIn="@layout/activity_main"
tools_context=".MainActivity">

<TextView
android_layout_width="wrap_content"
android_layout_height="wrap_content"
android_layout_gravity="center_horizontal"
android_autoLink="web"
android_text="http://android-er.blogspot.com/"
android_textStyle="bold" />

<TextView
android_id="@+id/body"
android_layout_width="match_parent"
android_layout_height="match_parent"
android_textColor="@android:color/white"
android_background="@android:color/black"
android_typeface="monospace"
android_gravity="bottom"/>

</LinearLayout>


Edit layout/activity_main.xml, just to change the icon of the FloatingActionButton.
<?xml version="1.0" encoding="utf-8"?>
<android.support.design.widget.CoordinatorLayout


android_layout_width="match_parent"
android_layout_height="match_parent" android_fitsSystemWindows="true"
tools_context=".MainActivity">

<android.support.design.widget.AppBarLayout android_layout_height="wrap_content"
android_layout_width="match_parent" android_theme="@style/AppTheme.AppBarOverlay">

<android.support.v7.widget.Toolbar android_id="@+id/toolbar"
android_layout_width="match_parent" android_layout_height="?attr/actionBarSize"
android_background="?attr/colorPrimary" app_popupTheme="@style/AppTheme.PopupOverlay" />

</android.support.design.widget.AppBarLayout>

<include layout="@layout/content_main" />

<android.support.design.widget.FloatingActionButton android_id="@+id/fab"
android_layout_width="wrap_content" android_layout_height="wrap_content"
android_layout_gravity="bottom|end" android_layout_margin="@dimen/fab_margin"
android_src="@android:drawable/ic_menu_edit" />

</android.support.design.widget.CoordinatorLayout>


Create layout/setting_layout.xml, the layout of SettingDialog (OptionsMenu -> Setting), to list paired bluetooth to connect.
<?xml version="1.0" encoding="utf-8"?>
<LinearLayout

android_orientation="vertical"
android_layout_width="match_parent"
android_layout_height="match_parent">

<ListView
android_id="@+id/pairedlist"
android_layout_width="match_parent"
android_layout_height="match_parent"/>

</LinearLayout>

Create layout/typing_layout.xml, the layout of CmdLineDialog (open once FloatingActionButton is clicked), for user to enter command.
<?xml version="1.0" encoding="utf-8"?>
<LinearLayout

android_orientation="vertical"
android_layout_width="match_parent"
android_layout_height="match_parent">


<LinearLayout
android_layout_width="match_parent"
android_layout_height="wrap_content"
android_orientation="horizontal">
<EditText
android_id="@+id/cmdline"
android_layout_weight="1"
android_layout_width="0dp"
android_layout_height="wrap_content" />

<ImageView
android_id="@+id/clearcmd"
android_layout_width="wrap_content"
android_src="@android:drawable/ic_menu_close_clear_cancel"
android_layout_height="wrap_content" />
</LinearLayout>
<LinearLayout
android_layout_width="match_parent"
android_layout_height="match_parent"
android_orientation="horizontal">
<Button
android_id="@+id/clear"
android_layout_width="0dp"
android_layout_height="wrap_content"
android_layout_weight="1"
android_text="Clear"/>
<Button
android_id="@+id/dismiss"
android_layout_width="0dp"
android_layout_height="wrap_content"
android_layout_weight="1"
android_text="Dismiss"/>
<Button
android_id="@+id/enter"
android_layout_width="0dp"
android_layout_height="wrap_content"
android_layout_weight="1"
android_text="Enter"/>
</LinearLayout>

</LinearLayout>

MainActivity.java
[remark: a bug here, refer Update@2015-11-11on bottom of this post.]
package com.blogspot.android_er.androidbluetoothterminal;

import android.app.Activity;
import android.app.Dialog;
import android.app.DialogFragment;
import android.app.Fragment;
import android.app.FragmentTransaction;
import android.bluetooth.BluetoothAdapter;
import android.bluetooth.BluetoothDevice;
import android.bluetooth.BluetoothSocket;
import android.content.Intent;
import android.content.pm.PackageManager;
import android.os.Bundle;
import android.support.annotation.Nullable;
import android.support.design.widget.FloatingActionButton;
import android.support.v7.app.AppCompatActivity;
import android.support.v7.widget.Toolbar;
import android.text.method.ScrollingMovementMethod;
import android.view.LayoutInflater;
import android.view.Menu;
import android.view.MenuItem;
import android.view.View;
import android.view.ViewGroup;
import android.widget.AdapterView;
import android.widget.ArrayAdapter;
import android.widget.Button;
import android.widget.EditText;
import android.widget.ImageView;
import android.widget.ListView;
import android.widget.TextView;
import android.widget.Toast;

import java.io.IOException;
import java.io.InputStream;
import java.io.OutputStream;
import java.util.ArrayList;
import java.util.Set;
import java.util.UUID;

public class MainActivity extends AppCompatActivity {

private static final int REQUEST_ENABLE_BT = 1;

BluetoothAdapter bluetoothAdapter;

ArrayList<BluetoothDevice> pairedDeviceArrayList;
ArrayAdapter<BluetoothDevice> pairedDeviceAdapter;
private static UUID myUUID;
private final String UUID_STRING_WELL_KNOWN_SPP =
"00001101-0000-1000-8000-00805F9B34FB";

ThreadConnectBTdevice myThreadConnectBTdevice;
ThreadConnected myThreadConnected;

static TextView body;
FloatingActionButton fab;

@Override
protected void onCreate(Bundle savedInstanceState) {
super.onCreate(savedInstanceState);
setContentView(R.layout.activity_main);
Toolbar toolbar = (Toolbar) findViewById(R.id.toolbar);
setSupportActionBar(toolbar);

body = (TextView)findViewById(R.id.body);
body.setMovementMethod(new ScrollingMovementMethod());

fab = (FloatingActionButton) findViewById(R.id.fab);
fab.setOnClickListener(new View.OnClickListener() {
@Override
public void onClick(View view) {
showCmdLineDialog();
}
});

fab.setEnabled(false);
fab.setVisibility(FloatingActionButton.GONE);

if (!getPackageManager().hasSystemFeature(PackageManager.FEATURE_BLUETOOTH)){
Toast.makeText(this,
"FEATURE_BLUETOOTH NOT support",
Toast.LENGTH_LONG).show();
finish();
return;
}

//using the well-known SPP UUID
myUUID = UUID.fromString(UUID_STRING_WELL_KNOWN_SPP);

bluetoothAdapter = BluetoothAdapter.getDefaultAdapter();
if (bluetoothAdapter == null) {
Toast.makeText(this,
"Bluetooth is not supported on this hardware platform",
Toast.LENGTH_LONG).show();
finish();
return;
}

String strInfo = bluetoothAdapter.getName() + " " +
bluetoothAdapter.getAddress();
Toast.makeText(getApplicationContext(), strInfo, Toast.LENGTH_LONG).show();

}

@Override
protected void onStart() {
super.onStart();

//Turn ON BlueTooth if it is OFF
if (!bluetoothAdapter.isEnabled()) {
Intent enableIntent = new Intent(BluetoothAdapter.ACTION_REQUEST_ENABLE);
startActivityForResult(enableIntent, REQUEST_ENABLE_BT);
}
}

@Override
protected void onDestroy() {
super.onDestroy();
closeThreads();
}

private void closeThreads(){
if(myThreadConnectBTdevice!=null){
myThreadConnectBTdevice.cancel();
myThreadConnectBTdevice = null;
}

if(myThreadConnected!=null){
myThreadConnected.cancel();
myThreadConnected = null;
}
}

@Override
protected void onActivityResult(int requestCode, int resultCode, Intent data) {
if(requestCode==REQUEST_ENABLE_BT){
if(resultCode == Activity.RESULT_OK){

}else{
Toast.makeText(this,
"BlueTooth NOT enabled",
Toast.LENGTH_SHORT).show();
finish();
}
}
}

@Override
public boolean onCreateOptionsMenu(Menu menu) {
// Inflate the menu; this adds items to the action bar if it is present.
getMenuInflater().inflate(R.menu.menu_main, menu);
return true;
}

@Override
public boolean onOptionsItemSelected(MenuItem item) {
// Handle action bar item clicks here. The action bar will
// automatically handle clicks on the Home/Up button, so long
// as you specify a parent activity in AndroidManifest.xml.
int id = item.getItemId();

//noinspection SimplifiableIfStatement
if (id == R.id.action_settings) {
closeThreads();
fab.setEnabled(false);
fab.setVisibility(FloatingActionButton.GONE);
body.setText("");
showSettingDialog();
return true;
}

return super.onOptionsItemSelected(item);
}

void showSettingDialog() {
FragmentTransaction ft = getFragmentManager().beginTransaction();
Fragment prev = getFragmentManager().findFragmentByTag("dialog");
if (prev != null) {
ft.remove(prev);
}
ft.addToBackStack(null);

DialogFragment newFragment = SettingDialogFragment.newInstance(MainActivity.this);
newFragment.show(ft, "dialog");

}

void showCmdLineDialog() {

if(myThreadConnected == null){
Toast.makeText(MainActivity.this,
"myThreadConnected == null",
Toast.LENGTH_LONG).show();
return;
}

FragmentTransaction ft = getFragmentManager().beginTransaction();
Fragment prev = getFragmentManager().findFragmentByTag("cmdline");
if (prev != null) {
ft.remove(prev);
}
ft.addToBackStack(null);

DialogFragment newFragment = TypingDialogFragment.newInstance(MainActivity.this, myThreadConnected);
newFragment.show(ft, "cmdline");

}

private void setup(ListView lv, final Dialog dialog) {
Set<BluetoothDevice> pairedDevices = bluetoothAdapter.getBondedDevices();
if (pairedDevices.size() > 0) {
pairedDeviceArrayList = new ArrayList<BluetoothDevice>();

for (BluetoothDevice device : pairedDevices) {
pairedDeviceArrayList.add(device);
}

pairedDeviceAdapter = new ArrayAdapter<BluetoothDevice>(this,
android.R.layout.simple_list_item_1, pairedDeviceArrayList);
lv.setAdapter(pairedDeviceAdapter);

lv.setOnItemClickListener(new AdapterView.OnItemClickListener() {

@Override
public void onItemClick(AdapterView<?> parent, View view,
int position, long id) {
BluetoothDevice device =
(BluetoothDevice) parent.getItemAtPosition(position);
Toast.makeText(MainActivity.this,
"Name: " + device.getName() + " "
+ "Address: " + device.getAddress() + " "
+ "BondState: " + device.getBondState() + " "
+ "BluetoothClass: " + device.getBluetoothClass() + " "
+ "Class: " + device.getClass(),
Toast.LENGTH_LONG).show();

Toast.makeText(MainActivity.this, "start ThreadConnectBTdevice", Toast.LENGTH_LONG).show();
myThreadConnectBTdevice = new ThreadConnectBTdevice(device, dialog);
myThreadConnectBTdevice.start();
}
});
}
}

public static class SettingDialogFragment extends DialogFragment {

ListView listViewPairedDevice;
static MainActivity parentActivity;

static SettingDialogFragment newInstance(MainActivity parent){
parentActivity = parent;
SettingDialogFragment f = new SettingDialogFragment();
return f;
}

@Nullable
@Override
public View onCreateView(LayoutInflater inflater,
ViewGroup container, Bundle savedInstanceState) {
getDialog().setTitle("Setting");
getDialog().setCanceledOnTouchOutside(false);
View settingDialogView = inflater.inflate(R.layout.setting_layout, container, false);

listViewPairedDevice = (ListView)settingDialogView.findViewById(R.id.pairedlist);

parentActivity.setup(listViewPairedDevice, getDialog());

return settingDialogView;
}
}

public static class TypingDialogFragment extends DialogFragment {

EditText cmdLine;
static MainActivity parentActivity;
static ThreadConnected cmdThreadConnected;

static TypingDialogFragment newInstance(MainActivity parent, ThreadConnected thread){
parentActivity = parent;
cmdThreadConnected = thread;
TypingDialogFragment f = new TypingDialogFragment();
return f;
}

@Nullable
@Override
public View onCreateView(LayoutInflater inflater,
ViewGroup container, Bundle savedInstanceState) {
getDialog().setTitle("Cmd Line");
getDialog().setCanceledOnTouchOutside(false);
View typingDialogView = inflater.inflate(R.layout.typing_layout, container, false);

cmdLine = (EditText)typingDialogView.findViewById(R.id.cmdline);

ImageView imgCleaarCmd = (ImageView)typingDialogView.findViewById(R.id.clearcmd);
imgCleaarCmd.setOnClickListener(new View.OnClickListener() {
@Override
public void onClick(View v) {
cmdLine.setText("");
}
});

Button btnEnter = (Button)typingDialogView.findViewById(R.id.enter);
btnEnter.setOnClickListener(new View.OnClickListener() {
@Override
public void onClick(View v) {
if(cmdThreadConnected!=null){
byte[] bytesToSend = cmdLine.getText().toString().getBytes();
cmdThreadConnected.write(bytesToSend);
byte[] NewLine = " ".getBytes();
cmdThreadConnected.write(NewLine);
}
}
});

Button btnDismiss = (Button)typingDialogView.findViewById(R.id.dismiss);
btnDismiss.setOnClickListener(new View.OnClickListener() {
@Override
public void onClick(View v) {
dismiss();
}
});

Button btnClear = (Button)typingDialogView.findViewById(R.id.clear);
btnClear.setOnClickListener(new View.OnClickListener() {
@Override
public void onClick(View v) {
body.setText("");
}
});

return typingDialogView;
}
}

//Called in ThreadConnectBTdevice once connect successed
//to start ThreadConnected
private void startThreadConnected(BluetoothSocket socket){

myThreadConnected = new ThreadConnected(socket);
myThreadConnected.start();
}

/*
ThreadConnectBTdevice:
Background Thread to handle BlueTooth connecting
*/
private class ThreadConnectBTdevice extends Thread {

private BluetoothSocket bluetoothSocket = null;
private final BluetoothDevice bluetoothDevice;
Dialog dialog;

private ThreadConnectBTdevice(BluetoothDevice device, Dialog dialog) {
this.dialog = dialog;
bluetoothDevice = device;

try {
bluetoothSocket = device.createRfcommSocketToServiceRecord(myUUID);
Toast.makeText(MainActivity.this,
"bluetoothSocket: " + bluetoothSocket,
Toast.LENGTH_SHORT).show();
} catch (IOException e) {
// TODO Auto-generated catch block
e.printStackTrace();
}
}

@Override
public void run() {
boolean success = false;
try {
bluetoothSocket.connect();
success = true;
} catch (IOException e) {
e.printStackTrace();

final String eMessage = e.getMessage();
runOnUiThread(new Runnable() {

@Override
public void run() {
Toast.makeText(MainActivity.this,
"something wrong bluetoothSocket.connect(): " + eMessage,
Toast.LENGTH_SHORT).show();
}
});

try {
bluetoothSocket.close();
} catch (IOException e1) {
// TODO Auto-generated catch block
e1.printStackTrace();
}
}

if(success){
//connect successful
final String msgconnected = "connect successful: "
+ "BluetoothSocket: " + bluetoothSocket + " "
+ "BluetoothDevice: " + bluetoothDevice;

runOnUiThread(new Runnable() {

@Override
public void run() {
fab.setEnabled(true);
fab.setVisibility(FloatingActionButton.VISIBLE);
body.setText("");
Toast.makeText(MainActivity.this, msgconnected, Toast.LENGTH_LONG).show();
dialog.dismiss();
}
});

startThreadConnected(bluetoothSocket);

}else{
//fail
}
}

public void cancel() {

Toast.makeText(getApplicationContext(),
"close bluetoothSocket",
Toast.LENGTH_LONG).show();
try {
bluetoothSocket.close();
} catch (IOException e) {
// TODO Auto-generated catch block
e.printStackTrace();
}

}

}

/*
ThreadConnected:
Background Thread to handle Bluetooth data communication
after connected
*/
private class ThreadConnected extends Thread {
private final BluetoothSocket connectedBluetoothSocket;
private final InputStream connectedInputStream;
private final OutputStream connectedOutputStream;

boolean running;

public ThreadConnected(BluetoothSocket socket) {
connectedBluetoothSocket = socket;
InputStream in = null;
OutputStream out = null;
running = true;
try {
in = socket.getInputStream();
out = socket.getOutputStream();
} catch (IOException e) {
// TODO Auto-generated catch block
e.printStackTrace();
}

connectedInputStream = in;
connectedOutputStream = out;
}

@Override
public void run() {
byte[] buffer = new byte[1024];
int bytes;

String strRx = "";

while (running) {
try {
bytes = connectedInputStream.read(buffer);
final String strReceived = new String(buffer, 0, bytes);
final String strByteCnt = String.valueOf(bytes) + " bytes received. ";

runOnUiThread(new Runnable(){

@Override
public void run() {
body.append(strReceived);
}});

} catch (IOException e) {
// TODO Auto-generated catch block
e.printStackTrace();

final String msgConnectionLost = "Connection lost: "
+ e.getMessage();
runOnUiThread(new Runnable(){

@Override
public void run() {
Toast.makeText(MainActivity.this, msgConnectionLost, Toast.LENGTH_LONG).show();

}});
}
}
}

public void write(byte[] buffer) {
try {
connectedOutputStream.write(buffer);
} catch (IOException e) {
// TODO Auto-generated catch block
e.printStackTrace();
}
}

public void cancel() {
running = false;
try {
connectedBluetoothSocket.close();
} catch (IOException e) {
// TODO Auto-generated catch block
e.printStackTrace();
}
}
}

}


uses-permission of "android.permission.BLUETOOTH" is needed in src/main/AndroidManifest.xml.
<?xml version="1.0" encoding="utf-8"?>
<manifest
package="com.blogspot.android_er.androidbluetoothterminal" >

<uses-permission android_name="android.permission.BLUETOOTH"/>
<application
android_allowBackup="true"
android_icon="@mipmap/ic_launcher"
android_label="@string/app_name"
android_supportsRtl="true"
android_theme="@style/AppTheme" >
<activity
android_name=".MainActivity"
android_label="@string/app_name"
android_theme="@style/AppTheme.NoActionBar" >
<intent-filter>
<action android_name="android.intent.action.MAIN" />

<category android_name="android.intent.category.LAUNCHER" />
</intent-filter>
</activity>
</application>

</manifest>


download filesDownload the files (Android Studio Format) .

download filesDownload APK .


Update@2015-11-11:
In the above code of MainActivity.java, in run() of ThreadConnected, if Connection lost (such as Raspberry Pi or HC-06 power OFF), the thread will still keep running.

So have to cancel the thread and disable the FloatingActionButton. Modify run() of ThreadConnected.
 @Override
public void run() {
byte[] buffer = new byte[1024];
int bytes;

String strRx = "";

while (running) {
try {
bytes = connectedInputStream.read(buffer);
final String strReceived = new String(buffer, 0, bytes);
final String strByteCnt = String.valueOf(bytes) + " bytes received. ";

runOnUiThread(new Runnable(){

@Override
public void run() {
body.append(strReceived);
}});

} catch (IOException e) {
// TODO Auto-generated catch block
e.printStackTrace();

cancel();

final String msgConnectionLost = "Connection lost: "
+ e.getMessage();
runOnUiThread(new Runnable(){

@Override
public void run() {
Toast.makeText(MainActivity.this, msgConnectionLost, Toast.LENGTH_LONG).show();

fab.setEnabled(false);
fab.setVisibility(FloatingActionButton.GONE);


}});
}
}
}


Read More..

Friday, April 29, 2016

Threading in Android part 1 Handlers

Multi-Threading concept is essential in most platforms. it provides maximum

utilization of the processor. threading is used when the program executes

time consuming processes (such as calling a web service) and to give a

good user experience by unblocking the UI.

Android provides threading techniques to perform time consuming tasks in a

background thread with coordination with the UI thread to update the UI.

Android provides the following methods of threading:
  1. Handlers.
  2. Async. Tasks.
Handlers:
When you create an object from the Handler class, it processes

Messages and Runnable objects associated with the

current thread MessageQueue. the message queue holds the

tasks to be executed in FIFO (First In First Out) mannser. you will need

only ine Handler per activity where the background thread will

communicate with to update the UI.

The Handler is associated with the thread from which its been created

We can communicate with the Handler by two methods:
  1. Messages.
  2. Runnable objects.
In this post we will demonstrate how to use both using a simple example which is

updating the text of a TextView using multiple threads.

Using Messages:

the steps of using a Handler are as follows:
  1. You create a Handler object with an asscociated callback

    method to handle the received messages (it is the method where the UI update

    will be done).
  2. From the background thread you will need to send messages to the

    handler.
Heres the code of our activity:
public class MainActivity extends Activity {
TextView txt;
// our handler
Handler handler = new Handler() {
@Override
public void handleMessage(Message msg) {
//display each item in a single line
txt.setText(txt.getText()+"Item "+System.getProperty("line.separator"));
}
};

/** Called when the activity is first created. */
@Override
public void onCreate(Bundle savedInstanceState) {
super.onCreate(savedInstanceState);
setContentView(R.layout.main);
txt=(TextView)findViewById(R.id.txt);
}

@Override
protected void onStart() {
super.onStart();
// create a new thread
Thread background=new Thread(new Runnable() {

@Override
public void run() {
for(int i=0;i<10;i++)
{
try {
Thread.sleep(1000); b.putString("My Key", "My Value:

"+String.valueOf(i));
// send message to the handler with the current message handler

handler.sendMessage(handler.obtainMessage());
} catch (Exception e) {
Log.v("Error", e.toString());
}
}
}
});

background.start();
}
}
after running the following code the TextView will display the following,

each second a new line is written:

This example is pretty basic, it just sends the same message for a number of

times.
what if we want the message sent to hold data thats changed each time the

message is sent, the answer is to use Message.setData(Bundle bundle)

method by creating a Bundle object and adding the data to it like this:
public class MainActivity extends Activity {
TextView txt;
// our handler
Handler handler = new Handler() {
@Override
public void handleMessage(Message msg) {
// get the bundle and extract data by key
Bundle b = msg.getData();
String key = b.getString("My Key");
txt.setText(txt.getText() + "Item " + key
+System.getProperty("line.separator"));
}
};

/** Called when the activity is first created. */
@Override
public void onCreate(Bundle savedInstanceState) {
super.onCreate(savedInstanceState);
setContentView(R.layout.main);
txt = (TextView) findViewById(R.id.txt);
}

@Override
protected void onStart() {
super.onStart();
// create a new thread
Thread background = new Thread(new Runnable() {

@Override
public void run() {
for (int i = 0; i < 10; i++) {
try {
Thread.sleep(1000);
Message msg = new Message();
Bundle b = new Bundle();
b.putString("My Key", "My Value: " + String.valueOf(i));
msg.setData(b);
// send message to the handler with the current message handler
handler.sendMessage(msg);
} catch (Exception e) {
Log.v("Error", e.toString());
}
}
}
});

background.start();
}
}
we put a string to the bundle and send a message with that bundle. in the

handler method we receive the bundle and get the value with the predefined key.
after executing that code the text view would look like this:

Using Runnables:
another way to use Handlers is to pass them a Runnable by using the

Handler.post() method like this:
Runnable r=new Runnable() {

@Override
public void run() {
txt.setText("Runnable");

}
};

handler.post(r);

this will add the Runanble object to the message queue to be executed by

the handler.

Sending Messages in a

timely manner:
we can use handlers to send messages or post runnables at time intervals using

the following methods:

  1. handler.sendEmptyMessageAtTime(int what,long uptimeMillis):sends an
     empty message at a specific time in milli-seconds, can be defined by using the
    SystemClock.uptimeMillis() method to get the time since the device boot
     in milli-seconds and concatinating to it.
  2. handler.sendEmptyMessageDelayed(int what,long delayMillis):sends an
     empty message after a certain amount of time in milli-seconds.
  3. handler.sendMessageAtTime(Message msg,long uptimeMillis).
  4. handler.sendMessageDelayed(Message msg,long delayMillis).
  5. handler.postAtTime(Runnable r,long uptimeMillis).
  6. handler.postAtTime(Runnable r,Object token,long uptimeMillis):posts a
     runnable with an object as a distinguishing token.
  7. handler.postDelayed(Runnable r,long delayMillis).
All the above messages return a boolean indicating whether the message or the

runnable has been placed successfully in the message queue.

Removing Call backs:
if you want to remove a runnable or a message from the message queue, you can

use the following methods:

  1. handler.removeCallbacks(Runnable r).
  2. handler.removeCallbacks(Runnable r,Object token).
  3. handler.removeCallbacksAndMessages(Object token).
  4. handler.removeMessages(int what).
  5. handler.removeMessages(int what,Object object)
Read More..

Thursday, April 28, 2016

:p>

tablayout,or,tabbed,view,android,developer,tutorial
Read More..

Wednesday, April 20, 2016

TabLayout or Tabbed View Android Developer Tutorial


This tutorial is about developing a TabLayout  / tabs which is one of the very important ways of providing the UI in Android.  The default Contacts application uses this layout.

For creating a tab Layout, we need to look at 3 new aspects: TabActivity, TabHostand TabWidget.

Let us begin by looking at how we should declare the layout xml.  The root node has to be a TabHost. What is a TabHostand why is it required? It is nothing but a container for the tabbed view we want to create. It provides methods to add the tabs, remove them and to bring focus to a specific tab etc.

Within this, we need to have a two objects: TabWidgetand a FrameLayout.

The TabWidgetitself does not do much except contain a list of tab labels that exist within the parent TabHost.  Basically it is nothing but a set of labels that the user clicks in order to select a specific tab. The actual content of each tab is to be held by the 2nd object in the TabHosti.e. a FrameLayout. Hence both the TabWidgetand FrameLayoutneed to be present on each tab. And in order to align htme one after another, we embed them into a LinearLayout.

Hence the layout XML would be like this:

<TabHost
      >="http://schemas.android.com/apk/res/android"
      android:id="@android:id/tabhost"
      android:layout_width="fill_parent"
      android:layout_height="fill_parent"
      >
<LinearLayout
      android:id="@+id/LinearLayout01"
      android:layout_width="fill_parent"
      android:layout_height="fill_parent"
      android:orientation="vertical">
<TabWidget
      android:id="@android:id/tabs"
      android:layout_width="fill_parent"
      android:layout_height="wrap_content"></TabWidget>
<FrameLayout
      android:id="@android:id/tabcontent"
      android:layout_width="fill_parent"
      android:layout_height="fill_parent"></FrameLayout>

</LinearLayout>
</TabHost>

Now, we will move on to the coding of activities for a Tabbed Layout.

In the application, I want to have 3 tabs. So how do I do it?

Each of the tabs can have either a View, launch an activity by passing an intent or create a view dynamically by using TabHost.TabContentFactory. I have chosen to show only activities in all my tabs.

So, how many activities do you think we need? 3? Sorry 4! There needs to be a main or the parent activity that would display the whole tabbed view and one activity in each of the tabs.

Now let us look at developing the main activity. This has to extend the TabActivity.  This is no different from an Activity except for the additional ability to handle multiple embedded activities or views.

So here is the main class declaration:

public class TabLayoutSample extends TabActivity {

Let us see now, how to create the first tab.

First, we need to get a handle to the TabHostthat we have declared in the XML layout file, so that we can add tab activities into it. Here is the code for the same:

      TabHost tabHost = getTabHost();  // The activity TabHost

Into this TabHost, we need to add the tab. How can we? TabHostprovides an inner class called TabSpecthat allows you to create a tab, populate its contents and add it as a tab to the TabHost.  See how it is done:

TabHost.TabSpec spec; 

// Create an Intent to launch an Activity for the tab (to be reused)
      intent = new Intent().setClass(this, WelcomeActivity.class);

      // Initialize a TabSpec for each tab and add it to the TabHost
      spec = tabHost.newTabSpec("welcome").setIndicator("Welcome",
                          res.getDrawable(R.drawable.tab_welcome))
                      .setContent(intent);
      tabHost.addTab(spec);

In the first line above, we are creating a spec variable of type TabSpec. Then we are creating an intent that would be forming the content of the first tab. Then, we associate it with the TabSpec.

Since, each tab should have a tab indicator, content and a tag to keep track of it, it is achieved through setIndicator(..) method. Even the image that should be shown in the tab at the top is set through the same method’s 2nd parameter res.getDrawable(R.Drawable.tab_welcome). What is this and how did I set the image?

This part is a long set of steps but very easy to do. Create two images one in light color and one in dark color. Call them as welcome.png and welcome_sepia.png. Copy them into the /res/drawable-mdpi folder.  The, you need to create a state-list drawable that specifies which image to use for each tab state:

[A StateListDrawable is a drawable object defined in XML that uses a several different images to represent the same graphic, depending on the state of the object. For example, a Button widget can exist in one of several different states (pressed, focused, or neither) and, using a state list drawable, you can provide a different background image for each state.]

So, here is the tab_welcome.xml:

<?xml version="1.0"encoding="UTF-8"?>

<selector >="http://schemas.android.com/apk/res/android">
    <!-- When selected, use grey -->
    <item android:drawable="@drawable/welcome"
          android:state_selected="true"/>
    <!-- When not selected, use white-->
    <item android:drawable="@drawable/welcome_sepia"/>
</selector> Read More..

Tuesday, April 19, 2016

Creating Android UI Programmatically


So far, in all my examples, I have been using the declarative way of creating an Android UI using XML. However, there could arise certain situations when you may have to create UI programmatically. Sincere advice would be to avoid such a design since android has a wonderful architecture where the UI and the program are well separated. However, for those few exceptional cases where we may need too… here is how we do it.
Every single view or viewgroupelement has an equivalent java class in the SDK. The structure and naming of the classes and methods is very similar to the XML vocabulary that we are used to so far.
Let us start with a LinearLayout. How would we declare it in an XML?
<?xml version="1.0"encoding="utf-8"?>
<LinearLayout >="http://schemas.android.com/apk/res/android"
    android:orientation="vertical"
    android:layout_width="fill_parent"
    android:layout_height="fill_parent"
    >
<TextView 
    android:layout_width="fill_parent"
    android:layout_height="wrap_content"
    android:text="@string/hello"
    />
</LinearLayout>
This just contains a TextViewembedded in a LinearLayout. A very trivial example. But serves the purpose intended. Let me show how almost every single element here corresponds to a class or a method call in the class.  So the equivalent code in the onCreate(…)  method of an activity would be like this:
         super.onCreate(savedInstanceState);
      
        lLayout = newLinearLayout(this);
        lLayout.setOrientation(LinearLayout.VERTICAL);
        //-1(LayoutParams.MATCH_PARENT) is fill_parent or match_parent since API level 8
        //-2(LayoutParams.WRAP_CONTENT) is wrap_content
        lLayout.setLayoutParams(new LayoutParams(
LayoutParams.MATCH_PARENT,
LayoutParams.MATCH_PARENT));
        tView = newTextView(this);
        tView.setText("Hello, This is a view created programmatically! " +
                  "You CANNOT change me that easily :-)");
        tView.setLayoutParams(new LayoutParams(
LayoutParams.MATCH_PARENT,
LayoutParams.WRAP_CONTENT));
        lLayout.addView(tView);
        setContentView(lLayout);

Like this any layout view can be created. But from this small example you can notice two outstanding things – very tedious to code for every attribute of the view. And any simple change in the view, you need to change the code, compile, deploy and only then you see the effect of the change – unlike in a layout editor. 


You can download the sample code here.
Read More..