Pages

Showing posts with label tutorial. Show all posts

Friday, May 13, 2016

Simple ListView Android Developer Tutorial Part 16

From exploring the various concepts related to fundamentals and to locations and maps, I would like to look at a few UI elements.


One of the simple views is a List View. In this post, I will explore a very simple list view using all the defaults provided by Android SDK and introduce you to a customized list view in the next blog article.

A List View, by name means being able to display a list of items in an order one below the other. For creating such a view, the first thing we have to do is extend the ‘ListActivity’ (android.app.ListActivity) instead of the normal Activity class.

So, here is how the class declaration should look:

public class MyListView extends ListActivity {
The ListActivity class provides a way of binding a source of data (an array or a cursor) to a ListView object through a ListAdapter.

In android, we all know that views are defined declaratively in XML files. It is the same here too. So, if we were to create our own custom ListView, we would have a declaration of this type:

<ListView android_id="@id/android:list"
android:layout_width="fill_parent"
android:layout_height="fill_parent"
android:background="#000fff"
android:layout_weight="2"
android:drawSelectorOnTop="false">
</ListView>

However, if no ListView is declared, the ListActivity picks up a default ListView which fills the screen. So, in our example we will not declare any list view.

There is one more thing we need to define and that is how each row in the list should show up. This again, there are some defaults available which have names such as simple_list_item_1, simple_list_item_2, and two_line_list_item. So, in our example, I do not declare the layout for the rows but I will be using one of the defaults provided. So, in effect, I have not declared any layout – I am using the default screen layout and row layout.

Now, that we have the layouts out of our way, what else do we need for a List View. Of course, the list of data that needs to be displayed. Just to keep it simple, I will use an array of data for the same. So, here it is:

static final String[] PENS = new String[]{
"MONT Blanc",
"Gucci",
"Parker",
"Sailor",
"Porsche Design",
"Rotring",
"Sheaffer",
"Waterman"
};

Now, how do I bind this data to the default views described earlier? This is aided by a ListAdapter interface hosted by the ListActivity class that we have extended.

We need to use the setListAdapter(..) method of the ListActivity class to bid the two (data and view). Android provides many implementations of the ListAdapter. We will use the simple ArrayAdapter.

What does the ArrayAdapter expect?

It expects the context object, the row layout and the data in an array.

So here it is:

setListAdapter(new ArrayAdapter<String>(this,
android.R.layout.simple_list_item_1, PENS));
With this we are done in creating the ListView.

I have added a small piece of code to show we can handle events on selecting an item in the list, by overriding the protected method shown below:

protected void onListItemClick(ListView l, View v, int position, long id) {
super.onListItemClick(l, v, position, id);
Object o = this.getListAdapter().getItem(position);
String pen = o.toString();
Toast.makeText(this, "You have chosen the pen: " + " " + pen, Toast.LENGTH_LONG).show();
}

This toasts a message with the item selected.

The complete code is downloadable here.

Read More..

Android Developers Blog Can I use this Intent

We all know that the loose coupling provided by Android through intents is one of its most powerful features. It makes it possible for us to mix and match the use of activities between various applications as though they all belong to one.

However, when I want to invoke another application that has published an intent filter, I cannot always assume that the other application is available on the phone. So, I need to check its availability and then only enable the feature to call it.

This is very well explained in the link: Android Developers Blog: Can I use this Intent?

Read More..

Saturday, April 30, 2016

Earn Fbc 2013 Full Tutorial


Tools:

  • HSS
  • Security Kiss 
  • Google Chrome / Mozilla Firefox


Search Games The Many Generate FBC

  1. Ravenwood Fair (http://apps.facebook.com/ravenwoodfair)
  2. Draw mything (http://apps.facebook.com/drawmything)
  3. Zoo Paradise (http://apps.facebook.com/zoo-paradise)
  4. Tetris Battle (http://apps.facebook.com/tetris_battle)
  5. Paradise Life (http://apps.facebook.com/paradiselife/)
  6. Hero City (http://apps.facebook.com/hero-city)
  7. Crime City (http://apps.facebook.com/crimecitygame)
  8. Fashion Designer (http://apps.facebook.com/fashiondesignergame)
  9. Cafe Line (http://apps.facebook.com/mycafelife)
  10. Deal Or No Deal (http://apps.facebook.com/dealornodeal)
  11. Spartacusgame (https://apps.facebook.com/spartacusgame)

Remember! [VIDEO OUT REGULAR HOURS 12 Noon - 15 pmAfternoon]

Usage Procedure:

  1. Log In to Facebook Past
  2. Use Hotspot Shield & Security Kiss
  3. Then Activate Program Above
  4. Log Into Game
  5. Search Posts Earn & Watch Video
  6. Watch a video of the song until the end
  7. You will be 1 FBC per video


How to Watch Her Videos & View Frame Source:


  1. Locate the "Earn 1 Credit? Watch the entire video below. Click the banner to learn more"
  2. Right Click, Then Select "View Frame Source"
  3. Then, a new tab will appear
  4. Find trialpay.com Link in new tab (To Easily search click (Ctrl + F) >> See Picture Here
  5. Then copy the link after the mark (") to pre-mark (") {"= Quote Marks}
  6. After that, paste it into a new tab
  7. The video set
  8. After that play the vidio that first reply was in the last game link wait until it finishes loading.
  9. After that video is in another tab it can be played together or going on a swivel 1/1 is fine :)

Read More..

n style"

contacts,api,2,0,and,above,android,developer,tutorial
Read More..

Thursday, April 28, 2016

:p>

tablayout,or,tabbed,view,android,developer,tutorial
Read More..

Wednesday, April 20, 2016

TabLayout or Tabbed View Android Developer Tutorial


This tutorial is about developing a TabLayout  / tabs which is one of the very important ways of providing the UI in Android.  The default Contacts application uses this layout.

For creating a tab Layout, we need to look at 3 new aspects: TabActivity, TabHostand TabWidget.

Let us begin by looking at how we should declare the layout xml.  The root node has to be a TabHost. What is a TabHostand why is it required? It is nothing but a container for the tabbed view we want to create. It provides methods to add the tabs, remove them and to bring focus to a specific tab etc.

Within this, we need to have a two objects: TabWidgetand a FrameLayout.

The TabWidgetitself does not do much except contain a list of tab labels that exist within the parent TabHost.  Basically it is nothing but a set of labels that the user clicks in order to select a specific tab. The actual content of each tab is to be held by the 2nd object in the TabHosti.e. a FrameLayout. Hence both the TabWidgetand FrameLayoutneed to be present on each tab. And in order to align htme one after another, we embed them into a LinearLayout.

Hence the layout XML would be like this:

<TabHost
      >="http://schemas.android.com/apk/res/android"
      android:id="@android:id/tabhost"
      android:layout_width="fill_parent"
      android:layout_height="fill_parent"
      >
<LinearLayout
      android:id="@+id/LinearLayout01"
      android:layout_width="fill_parent"
      android:layout_height="fill_parent"
      android:orientation="vertical">
<TabWidget
      android:id="@android:id/tabs"
      android:layout_width="fill_parent"
      android:layout_height="wrap_content"></TabWidget>
<FrameLayout
      android:id="@android:id/tabcontent"
      android:layout_width="fill_parent"
      android:layout_height="fill_parent"></FrameLayout>

</LinearLayout>
</TabHost>

Now, we will move on to the coding of activities for a Tabbed Layout.

In the application, I want to have 3 tabs. So how do I do it?

Each of the tabs can have either a View, launch an activity by passing an intent or create a view dynamically by using TabHost.TabContentFactory. I have chosen to show only activities in all my tabs.

So, how many activities do you think we need? 3? Sorry 4! There needs to be a main or the parent activity that would display the whole tabbed view and one activity in each of the tabs.

Now let us look at developing the main activity. This has to extend the TabActivity.  This is no different from an Activity except for the additional ability to handle multiple embedded activities or views.

So here is the main class declaration:

public class TabLayoutSample extends TabActivity {

Let us see now, how to create the first tab.

First, we need to get a handle to the TabHostthat we have declared in the XML layout file, so that we can add tab activities into it. Here is the code for the same:

      TabHost tabHost = getTabHost();  // The activity TabHost

Into this TabHost, we need to add the tab. How can we? TabHostprovides an inner class called TabSpecthat allows you to create a tab, populate its contents and add it as a tab to the TabHost.  See how it is done:

TabHost.TabSpec spec; 

// Create an Intent to launch an Activity for the tab (to be reused)
      intent = new Intent().setClass(this, WelcomeActivity.class);

      // Initialize a TabSpec for each tab and add it to the TabHost
      spec = tabHost.newTabSpec("welcome").setIndicator("Welcome",
                          res.getDrawable(R.drawable.tab_welcome))
                      .setContent(intent);
      tabHost.addTab(spec);

In the first line above, we are creating a spec variable of type TabSpec. Then we are creating an intent that would be forming the content of the first tab. Then, we associate it with the TabSpec.

Since, each tab should have a tab indicator, content and a tag to keep track of it, it is achieved through setIndicator(..) method. Even the image that should be shown in the tab at the top is set through the same method’s 2nd parameter res.getDrawable(R.Drawable.tab_welcome). What is this and how did I set the image?

This part is a long set of steps but very easy to do. Create two images one in light color and one in dark color. Call them as welcome.png and welcome_sepia.png. Copy them into the /res/drawable-mdpi folder.  The, you need to create a state-list drawable that specifies which image to use for each tab state:

[A StateListDrawable is a drawable object defined in XML that uses a several different images to represent the same graphic, depending on the state of the object. For example, a Button widget can exist in one of several different states (pressed, focused, or neither) and, using a state list drawable, you can provide a different background image for each state.]

So, here is the tab_welcome.xml:

<?xml version="1.0"encoding="UTF-8"?>

<selector >="http://schemas.android.com/apk/res/android">
    <!-- When selected, use grey -->
    <item android:drawable="@drawable/welcome"
          android:state_selected="true"/>
    <!-- When not selected, use white-->
    <item android:drawable="@drawable/welcome_sepia"/>
</selector> Read More..

Tuesday, April 19, 2016

Creating Android UI Programmatically


So far, in all my examples, I have been using the declarative way of creating an Android UI using XML. However, there could arise certain situations when you may have to create UI programmatically. Sincere advice would be to avoid such a design since android has a wonderful architecture where the UI and the program are well separated. However, for those few exceptional cases where we may need too… here is how we do it.
Every single view or viewgroupelement has an equivalent java class in the SDK. The structure and naming of the classes and methods is very similar to the XML vocabulary that we are used to so far.
Let us start with a LinearLayout. How would we declare it in an XML?
<?xml version="1.0"encoding="utf-8"?>
<LinearLayout >="http://schemas.android.com/apk/res/android"
    android:orientation="vertical"
    android:layout_width="fill_parent"
    android:layout_height="fill_parent"
    >
<TextView 
    android:layout_width="fill_parent"
    android:layout_height="wrap_content"
    android:text="@string/hello"
    />
</LinearLayout>
This just contains a TextViewembedded in a LinearLayout. A very trivial example. But serves the purpose intended. Let me show how almost every single element here corresponds to a class or a method call in the class.  So the equivalent code in the onCreate(…)  method of an activity would be like this:
         super.onCreate(savedInstanceState);
      
        lLayout = newLinearLayout(this);
        lLayout.setOrientation(LinearLayout.VERTICAL);
        //-1(LayoutParams.MATCH_PARENT) is fill_parent or match_parent since API level 8
        //-2(LayoutParams.WRAP_CONTENT) is wrap_content
        lLayout.setLayoutParams(new LayoutParams(
LayoutParams.MATCH_PARENT,
LayoutParams.MATCH_PARENT));
        tView = newTextView(this);
        tView.setText("Hello, This is a view created programmatically! " +
                  "You CANNOT change me that easily :-)");
        tView.setLayoutParams(new LayoutParams(
LayoutParams.MATCH_PARENT,
LayoutParams.WRAP_CONTENT));
        lLayout.addView(tView);
        setContentView(lLayout);

Like this any layout view can be created. But from this small example you can notice two outstanding things – very tedious to code for every attribute of the view. And any simple change in the view, you need to change the code, compile, deploy and only then you see the effect of the change – unlike in a layout editor. 


You can download the sample code here.
Read More..

Monday, April 18, 2016

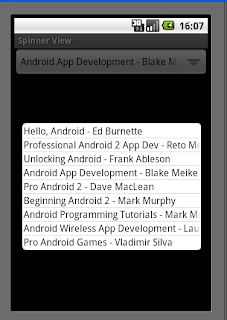
Spinner View Android Beginner Dev Tutorial

This is again another very simple tutorial on using a Spinner View provided by Android SDK. A spinner is supposed to be a view that displays one child at a time (Whatever that means).


This example is very similar to the previous one on AutoCompleteTextView.

Jumping right into the code, here is the layout xml file:

<Spinner
android:id="@+id/Spinner01"
android:layout_width="wrap_content"
android:layout_height="wrap_content"
android:drawSelectorOnTop = "true"></Spinner>


Nothing special. It just consists of one element.

Now in the main activity, I create an array of android books:

String[] androidBooks =
{
"Hello, Android - Ed Burnette",
"Professional Android 2 App Dev - Reto Meier",
"Unlocking Android - Frank Ableson",
"Android App Development - Blake Meike",
"Pro Android 2 - Dave MacLean",
"Beginning Android 2 - Mark Murphy",
"Android Programming Tutorials - Mark Murphy",
"Android Wireless App Development - Lauren Darcey",
"Pro Android Games - Vladimir Silva",
};

Then in the onCreate() method, I create an ArrayAdapter that I can pass to this Spinner as the data Source.

ArrayAdapter<String> adapter =
        new ArrayAdapter<String> (this,
        android.R.layout.simple_spinner_item,androidBooks);

Then, I get a handle to the Spinner, and set the ArrayAdapter to it

sp = (Spinner)findViewById(R.id.Spinner01);
sp.setAdapter(adapter);

Now, on selecting one of the items in the spinner, I want to be able to toast a message on the book that was selected. It is done as follows:

sp.setOnItemSelectedListener(new OnItemSelectedListener() {
    @Override
    public void onItemSelected(AdapterView<?> arg0, View arg1, int arg2, long arg3) {
        int item = sp.getSelectedItemPosition();
        Toast.makeText(getBaseContext(),
            "You have selected the book: " + androidBooks[item],
            Toast.LENGTH_SHORT).show();
    }


    @Override
    public void onNothingSelected(AdapterView<?> arg0) {
    }
});

That is it. Now execute and see it work. Here is how it would look:

The example code can be downloaded here.
Read More..

Sunday, April 17, 2016

SQLite DB Example Android Developer Tutorial Part 12


There are 4 ways of storing data on the android platform:

  • 1.    Preferences
  • 2.    SQLite Database
  • 3.    Files
  • 4.    Network

A word about each of them here and then I will move on to an example that shows how to work with SQLite DB that comes along with the android platform.


Preferences
Basically used for storing user preferences for a single application or across applications for a mobile. This is typically name-value pairs accessible to the context.


Databases –
Android supports creating of databases based on SQLite db. Each database is private to the applications that creates it

Files –
Files can be directly stored on the mobile or on to an extended storage medium. By default other applications cannot access it.


Network –
Data can be stored and retrieved from the network too depending on the availability.


If an application wants to store and retrieve data for its own use, without having to share the data across applications, it can access the SQLite DB directly. There is no need of a content provider. We have seen in an earlier post how to use content providers.


In this example, we will do the following:
1.    Create a database (typically a one time activity)
2.    Create a table (typically a one time activity)
3.    Insert values into the table
4.    Retrieve the values from the table
5.    Display the retrieved values as a List view
6.    Delete all the records from the table before closing the connection to the database


Step 1: Create a database:


   sampleDB =  this.openOrCreateDatabase(SAMPLE_DB_NAME, MODE_PRIVATE, null);

This opens a database defined in the constant SAMPLE_DB_NAME, if it already exists. Else it creates a database and opens it. The second parameter is operating mode : MODE_PRIVATE meaning it is accessible to only this context. The other modes are and MODE_WORLD_WRITABLE. MODE_WORLD_READABLE


Step 2: Create a Table:


sampleDB.execSQL("CREATE TABLE IF NOT EXISTS " +
                        SAMPLE_TABLE_NAME +
                        " (LastName VARCHAR, FirstName VARCHAR," +
                        " Country VARCHAR, Age INT(3));");


Step 3: Insert values into the table:


sampleDB.execSQL("INSERT INTO " +
                        SAMPLE_TABLE_NAME +
                        " Values (Makam,Sai Geetha,India,25);");


Step 4: Retrieve values


Cursor c = sampleDB.rawQuery("SELECT FirstName, Age FROM " +
                        SAMPLE_TABLE_NAME +
                        " where Age > 10 LIMIT 5", null);
           
      if (c != null ) {
            if  (c.moveToFirst()) {
                  do {
String firstName = c.getString(c.getColumnIndex("FirstName"));
                  int age = c.getInt(c.getColumnIndex("Age"));
                  results.add("" + firstName + ",Age: " + age);
                  }while (c.moveToNext());
            }
       }


Step 5: Display the values as a list
           
       this.setListAdapter(newArrayAdapter<String>(this, android.R.layout.simple_list_item_1,results));


The statement displays it as a list as the class extends a ListActivity.


Step 6: Delete the values from the table in the finally part of the try block


finally {
            if (sampleDB != null)
                  sampleDB.execSQL("DELETE FROM " + SAMPLE_TABLE_NAME);
                  sampleDB.close();
        }


It is as simple as this to work with the SQLite DB even in android. No different from a desktop application. However, there are various overloaded methods of query() provided by the SQLIteDatabase class which can be more optimally used instead of execSQL.


The complete code for this example is downloadable here.

Read More..

Sunday, April 10, 2016

nt-fami"

image,switcher,view,android,developer,tutorial
Read More..

Saturday, April 9, 2016

Options Menu Android Developer Tutorial

Almost every application will need a menu in order to facilitate a user to perform actions on the application. In Android there are three types of menus possible.

  1. Options Menu
  2. Context Menu
  3. Sub Menu

The Options menu is the one that appears when a user touches the menu button on the mobile. This is something that is associated with an activity.  In 3.0 and later, this is available in the Action Bar itself for quick access.

In this article, I am showing how to create an Options Menu for devices having Android 2.3 or below.

The Context Menu is a floating list of menu items that appears when a user touches and holds a particular item displayed in the view, which has a menu associated with it.

The Sub Menu is a floating list of menu items that appears when the user touches a menu item that contains a nested menu.

There are two ways of creating an Options Menu in your application. One is by instantiating the Menu class and the other is by inflating a Menu from an XML menu resource.  Based on best practices it is always better to define the Menu in an XML and inflate it in your code.

Now, let us start with the example.

I am going to just define 3 menu items in the XML. Inflate it in my code. And when a user clicks on any of the menu items, I just Toast a message on what has been clicked.

NOTE: This is as usual not a practically useful piece, but sticking to my style, I want to keep it as uncluttered and as simple as possible so that the learning happens easily. And the focus is only on what concept we are trying to learn.

So, here is my options_menu.xml that is created in the res/menu folder:

<?xml version="1.0" encoding="utf-8"?>
<menu >="http://schemas.android.com/apk/res/android">
      <item android:id="@+id/next"
              android:icon="@drawable/ic_next"
              android:title="@string/next" />
      <item android:id="@+id/previous"
            android:icon="@drawable/ic_previous"
            android:title="@string/previous" />
      <item android:id="@+id/list"
            android:icon="@drawable/ic_list"
            android:title="@string/list" /> 
</menu>

You see that the Menu root node consists of 3 item leaf nodes. Each of the items consists of an idicon and title. The resource id is unique to that item and it allows the application to recognize which item has been clicked by the user. The icon is a drawable that should exist in the res/drawable folder and is the one shown in the menu item. The string is the item’s title.

The above assumes that you have three images ic_next, ic_previous and ic_list copied into the drawable folder. It goes without saying that these image sizes should be kept as small as possible.
Once this is ready, we will create a class called ViewOptionsMenu. It’s onCreate(…) method would be a simple one calling the super method and displaying the content as shown below.

    public void onCreate(Bundle savedInstanceState) {
        super.onCreate(savedInstanceState);
            setContentView(R.layout.main);
    }

The main.xml just shows the message: “Click on the Options Menu to view the available Menu Options”.  This message as per the norm is defined in the strings.xml file that exists in the res/values folder. Here are the contents of the main.xml

<?xml version="1.0" encoding="utf-8"?>
<LinearLayout >="http://schemas.android.com/apk/res/android"
    android:orientation="vertical"
    android:layout_width="fill_parent"
    android:layout_height="fill_parent"
    >
<TextView 
    android:layout_width="fill_parent"
    android:layout_height="wrap_content"
    android:text="@string/welcome"
    android:textSize="20sp" android:textStyle="bold" android:capitalize="none" android:typeface="sans"/>
</LinearLayout>

Now, I need to override the method:  onCreateOptionsMenu(Menu menu). This method is called by Android the first time the activity is loaded. This is so for Android 2.3 and below.  Here is the code:

    public boolean onCreateOptionsMenu(Menu menu) {
      MenuInflater inflater = getMenuInflater();
      inflater.inflate(R.menu.options_menu, menu);
      return true;
    }

This method is getting a handle to the MenuInflater and using it to inflate the options menu that we have defined earlier in options_menu.xml in the res/menu folder.  That is it. The Menu is created. Isn’t is so simple?

Now, that the menu is created, how do we respond to the user when he clicks on the menu. This is done by overriding the onOptionsItemSelected(MenuItem item) method in the Activity itself as shown below:

public boolean onOptionsItemSelected(MenuItem item) {
      switch (item.getItemId()) {
      case R.id.next:
            Toast.makeText(this"You have chosen the " + getResources().getString(R.string.next) + " menu option",
Read More..