Pages

Showing posts with label text. Show all posts

Saturday, May 14, 2016

Android Text Controls

Text controls include:

1. TextView.

2. EditText

3. AutoCompleteEditText

4. MultiCompleteTextView

TextView
The TextView represent an un-editable text. It resembles the Label control in C# or ASP.NET but it has an interesting feature which is the ability to highlight the text if its is an URL, an e-mail or a phone number so that when the user clicks on the textview the default intent whether it is the web browser or the dialer launches
<?xml version="1.0" encoding="utf-8"?>
<LinearLayout
android_orientation="vertical"
android_layout_width="fill_parent"
android_layout_height="fill_parent"
>
<TextView
android_layout_width="fill_parent"
android_layout_height="wrap_content"
android_text="Visit Http://www.android-pro.blogspot.com"
android_autoLink="web"
android_id="@+id/txtURL"
/>

<TextView
android_layout_width="fill_parent"
android_layout_height="wrap_content"
android_text="Dial 1 650-253-0000"
android_autoLink="all"
/>
</LinearLayout>


you can see that the TextViews containing URLs or Phone numbers are highlighted, and when the user presses on them the default intent (the browser or the dialer launches)


this is done by using the property android:autoLink which can have the values:
web, email ,phone, map
or
All
this can be achieved from code by using the following code:
TextView txtURL=(TextView)findViewById(R.id.txtURL);
Linkify.addLinks(txtURL, Linkify.ALL);

EditText
The EditText is a subclass of the TextView it is like the TextBox in C#. it enables users to edit text.


We can use the autoText property to make the EditText to correct the common spelling mistakes.

<?xml version="1.0" encoding="utf-8"?>
<LinearLayout
android_orientation="vertical"
android_layout_width="fill_parent"
android_layout_height="fill_parent"
>
<EditText
android:layout_width="fill_parent"
android:layout_height="wrap_content"
android:autoText="true"

/>
</LinearLayout>


We can use the capitalize property to make the text capitalized like this:
<LinearLayout 
android_orientation="vertical"
android_layout_width="fill_parent"
android_layout_height="fill_parent"
>

<EditText
android:layout_width="fill_parent"
android:layout_height="wrap_content"
android:capitalize="characters"

/>
<EditText
android:layout_width="fill_parent"
android:layout_height="wrap_content"
android:capitalize="none"
/>
<EditText
android:layout_width="fill_parent"
android:layout_height="wrap_content"
android:capitalize="words"
/>
</LinearLayout>


we can use the password property to make the control accepts phone numbers input:
<?xml version="1.0" encoding="utf-8"?>
<LinearLayout
android_orientation="vertical"
android_layout_width="fill_parent"
android_layout_height="fill_parent"
>

<EditText
android:layout_width="fill_parent"
android:layout_height="wrap_content"
android:password="true"

/>

</LinearLayout>


We can enforce the Control to wrap all the text in a single line by setting android:singleLine property to true.

AutoCompleteTextView
The autoCompleteTextView is an EditText with auto complete functionality. The auto complete functionality can be achieved by attaching an Adapter with the auto complete values to the control like this:
<?xml version="1.0" encoding="utf-8"?>
<LinearLayout
android_orientation="vertical"
android_layout_width="fill_parent"
android_layout_height="fill_parent"
>

<AutoCompleteTextView
android:layout_width="fill_parent"
android:layout_height="wrap_content"
android:id="@+id/act"

/>

</LinearLayout>


Then attach the adapter from the code like this:
AutoCompleteTextView act=(AutoCompleteTextView)findViewById(R.id.act);
ArrayAdapter arr=new ArrayAdapter(this,android.R.layout.simple_dropdown_item_1line,new String []{"Hello","Hi","Alloha"});
act.setAdapter(arr);

in a search program for example you can obtain the auto complete words from a web service and populate the adapter with these words.

MultiAutoCompleteTextView

The AutoCompleteTextView can suggest auto complete for the entire text in the control, meaning that if you type more than one word it would try to match the whole sentence not the single words.
The MultiAutoCompleteTextView works the same way as the AutoCompleteTextView except you can add a Tokenizer that parses the text and allows you to suggest where to start suggesting words like this:
<?xml version="1.0" encoding="utf-8"?>
<LinearLayout
android_orientation="vertical"
android_layout_width="fill_parent"
android_layout_height="fill_parent"
>

<MultiAutoCompleteTextView
android:layout_width="fill_parent"
android:layout_height="wrap_content"
android:id="@+id/act"

/>

</LinearLayout>


then from code:
MultiAutoCompleteTextView mact=(MultiAutoCompleteTextView)findViewById(R.id.act);
ArrayAdapter arr=new ArrayAdapter(this,android.R.layout.simple_dropdown_item_1line,new String []{"Hello","Hi","Alloha"});
mact.setAdapter(arr);
mact.setTokenizer(new MultiAutoCompleteTextView.CommaTokenizer());

The tokenizer tells the control to start suggesting for words separated by a comma.
Read More..

Tuesday, May 10, 2016

Android Developing Remove Auto focus from Edit Text

Android Developing: Remove Auto focus from Edit Text: "When start Android application, it always auto focus EditText box. Here we give explain how to remove auto focus from EditText. Add your..."
Read More..

Sunday, April 24, 2016

Remote Service Android Developer Tutorial Part 9


Services typically are required to run for a long time and hence should run in their own thread. Such services can be invoked by any number of clients who want to connect to the service, invoke a few methods on the service and finally release the service, probably to serve more clients or close down.

Here, I would like to introduce you to the concept of connecting to a remote service and the kind of support provided by the android platform for the same.

We have earlier seen how local services can be created and used. The difference between the two mainly is that the local service runs in the same process as the application that started it and hence the life of the local service is dependent on the life of the said application while remote service can run in its own process. This causes a challenge of inter-process communication. If one process wants to communicate with another process, the object that is passed between the two needs to be marshaled.

For this purpose, Android provides the AIDL (Android Interface Definition Language) tool that handles the marshaling as well as the communication.

The service has to declare a service interface in an aidl file and the AIDL tool will automatically create a java interface corresponding to the aidl file. The AIDL tool also generates a stub class that provides an abstract implementation of the service interface methods. The actual service class will have to extend this stub class to provide the real implementation of the methods exposed through the interface.

The service clients will have to invoke the onBind() method on the service to be able to connect to the service. The onBind() method returns an object of the stub class to the client. Here are the code related code snippets:

The AIDL file:
package com.collabera.labs.sai;

interface IMyRemoteService {

      int getCounter();
}

Once you write this AIDL file (.aidl) in eclipse, it will automatically generate the Remote interface corresponding to this file. The remote interface will also provide a stub inner class which has to have an implementation provided by the RemoteService class. The stub class implementation within the service class is as given here:

private IMyRemoteService.Stub myRemoteServiceStub = newIMyRemoteService.Stub() {
            public int getCounter() throws RemoteException {
                  return counter;
            }
      };
The onBind() method in the service class:
      public IBinder onBind(Intent arg0) {
            Log.d(getClass().getSimpleName(), "onBind()");
            return myRemoteServiceStub;
      }

Now, let us quickly look at the meat of the service class before we move on to how the client connects to this service class. My RemoteService class is just incrementing a counter in a separate thread. This thread is created in the onStart()method as this gets certainly called whether the service is connected to by a call to startService(intent).Please read the lifecycle of a service if this needs more clarity. Here are the over-ridden onCreate(), onStart()and onDestroy()methods. Note that the resources are all released in the onDestroy()method.

      public void onCreate() {
            super.onCreate();
            Log.d(getClass().getSimpleName(),"onCreate()");
      }
      public void onStart(Intent intent, int startId) {
            super.onStart(intent, startId);
            serviceHandler = new Handler();
            serviceHandler.postDelayed(myTask, 1000L);
            Log.d(getClass().getSimpleName(), "onStart()");
      }
      public void onDestroy() {
            super.onDestroy();
            serviceHandler.removeCallbacks(myTask);
            serviceHandler = null;
            Log.d(getClass().getSimpleName(),"onDestroy()");
      }

A little explanation: In the onStart() method, I created a new Handler object that will spawn out a new task that implements the Runnableinterface. This thread does the job of incrementing the counter. Here is the code for the Task class – an inner class of the RemoteServiceclass.

class Task implements Runnable {
      public void run() {
            ++counter;
            serviceHandler.postDelayed(this,1000L);
            Log.i(getClass().getSimpleName(), "Incrementing counter in the run method");
      }
}

An object of this Taskclass is passed to the serviceHandler object as a message that needs to be executed after 1 second. The Taskclass implements the run() method in which we repeatedly post the same message to the serviceHandler. Thus, this becomes a repeated task till all the messages in the serviceHandlerqueue are deleted by calling the removeCallbacks()method on the serviceHandler in the destroy()method of the RemoteService class.

Note that the onDestroy()method thus stops this thread and set the service
Read More..

Saturday, March 26, 2016

Auto Complete Text View Android Beginner Dev Tutorial

This is a very simple tutorial on using Auto Complete Text View provided by Android SDK.


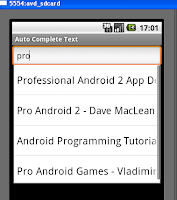
It consists of a single text box which can show suggestions based on a list of data that I provide as a source for this field. Just like Google Suggest, this also shows the nearest matches to the string that is being input by the end user.

So, here is the layout xml file:

<AutoCompleteTextView
android:id="@+id/AndroidBooks"
android:layout_width="fill_parent"
android:layout_height="wrap_content"></AutoCompleteTextView>

Nothing special. It just consists of one element.

Now in the main activity, I create an array of android books:

String[] androidBooks =
{
"Hello, Android - Ed Burnette",
"Professional Android 2 App Dev - Reto Meier",
"Unlocking Android - Frank Ableson",
"Android App Development - Blake Meike",
"Pro Android 2 - Dave MacLean",
"Beginning Android 2 - Mark Murphy",
"Android Programming Tutorials - Mark Murphy",
"Android Wireless App Development - Lauren Darcey",
"Pro Android Games - Vladimir Silva",
};

Then in the onCreate(..) method, I create an ArrayAdapter that I can pass to this AutoCompleteTextView as the data Source.

ArrayAdapter<String> adapter = new ArrayAdapter<String>(this,android.R.layout.simple_dropdown_item_1line,androidBooks);

Then, I get a handle to the AutocompleteTextView, and set the arrayAdapter to it along with the Threshold. The Threshold defines the number of charaters a user should type before the suggestions start showing up.

AutoCompleteTextView acTextView = (AutoCompleteTextView)findViewById(R.id.AndroidBooks);
acTextView.setThreshold(3);
acTextView.setAdapter(adapter);

That is it. Now execute and see it work. 
This is the way it would look:

The example code can be downloaded here.
Read More..

Thursday, March 10, 2016

Context Menu Android Developer Tutorial


This is a follow up to the Options Menu Tutorial shared earlier.

To recap, the Context Menu is a floating list of menu items that appears when a user touches and holds a particular item displayed in the view, which has a menu associated with it.

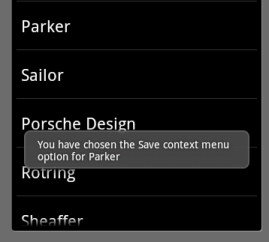
Going straight to the example, first I create a ListViewwith names of pens displayed. When one presses and holds one of the names for a long time, the context menu appears as shown here:

And when you click on any of the context menu shown above, the screen that appears is:

Let’s go to the code.

First, the mundane step of creating a Listview(you can see the ListView tutorial for more explanation on this).  
I create a class ShowContextMenuextending the ListActivity. In its OnCreate(…) method, I associate the Listview array with the ListAdapater as shown here:

public class ShowContextMenu extends ListActivity {
     

    /** Called when the activity is first created. */
    @Override
    public voidonCreate(Bundle savedInstanceState) {
        super.onCreate(savedInstanceState);

        setListAdapter(new ArrayAdapter<String>(this,
                android.R.layout.simple_list_item_1, getResources().getStringArray(R.array.names)));

…       
    }

Note that instead of hard-coding the list items as string array within the class, I have followed the best practice of externalizing the strings into a strings.xml resource class. Hence I use getResources().getStringArray(R.array.names) to retrieve the array of pen names that I want to display in the List.  The strings.xml file in the value folder has this entry:

<string-array name="names">
      <item>MONT Blanc</item>
      <item>Gucci</item>
      <item>Parker</item>
      <item>Sailor</item>
      <item>Porsche Design</item>
      <item>Rotring</item>
      <item>Sheaffer</item>
      <item>Waterman</item>
</string-array>

Once this Listview has been created, now we want to associate a ContextMenu with each of the rows in the Listview Item. i.e. is a user were to long-press one of the items, a menu should appear. For this we add the following line as well in the onCreate(..) method.
registerForContextMenu(getListView());

But how do we create the ContextMenu? Whenever the long-press happens, the onCreateContextMenu(…) method is invoked. So, we need to override this method as shown below:

    public voidonCreateContextMenu(ContextMenu menu, View v, ContextMenuInfo menuInfo) {
      super.onCreateContextMenu(menu, v, menuInfo);
      MenuInflater inflater = getMenuInflater();
      inflater.inflate(R.menu.context_menu, menu);
    }

Here again, just as in Options Menu tutorial, I use a MenuInflater to create the context menu rather than do it programmatically. This is certainly a best practice of keeping the concerns separated. The View and the programming logic are kept separate as meant to be in Android Programming.  The context menu consists of 4 items – Edit, Save, Delete, View. So, here is how it is defined in the context_menu.xml in the res/menu folder:

<menu
  >="http://schemas.android.com/apk/res/android">
      <item android:id="@+id/edit"
              android:title="@string/edit" />
      <item android:id="@+id/save"
            android:title="@string/save" />
      <item android:id="@+id/delete"
            android:title="@string/delete" />
      <item android:id="@+id/view"
            android:title="@string/view" />
</menu>

I have an id that is associated with each of the menu items that uniquely identifies the menu item selected. And I have a String associated with it which is what is displayed on the Menu.

Now that the context menu is created, how to handle when the menu item is clicked? For this we need to override the onContextItemSelected(…) method as shown below;

    public boolean onContextItemSelected(MenuItem item) { Read More..

Monday, February 8, 2016

Building Android Content Providers

Content providers are the way that Android applications can share info between each other. an application can ask for info from another application using content providers.

In this post were going to create a content provider to access data from our previous Employees simple application from the SQLite post.

to remind you the database has two tables Employees and Dept

remember that any content provider must provide the following:
  1. A URi from which we can run queries.
  2. MIME type corresponding to the content.
  3. Insert() method.
  4. Update() methd.
  5. Delete() method.

Creating the content type:

first we will create a new class, I will call it EmployeesContentProvider and choose its super class to be ContentProvider. the class initially will be like this:
package mina.android.DatabaseDemo;

import android.content.ContentProvider;
import android.content.ContentValues;
import android.database.Cursor;
import android.net.Uri;

public class EmployeesContentProvider extends ContentProvider {
DatabaseHelper db;
public static final Uri CONTENT_URI=Uri.parse("content://employees");
@Override
public int delete(Uri arg0, String arg1, String[] arg2) {
// TODO Auto-generated method stub
return 0;
}

@Override
public String getType(Uri uri) {
// TODO Auto-generated method stub
return null;
}

@Override
public Uri insert(Uri uri, ContentValues values) {
// TODO Auto-generated method stub
return null;
}

@Override
public boolean onCreate() {
// TODO Auto-generated method stub
return false;
}

@Override
public Cursor query(Uri uri, String[] projection, String selection,
String[] selectionArgs, String sortOrder) {
// TODO Auto-generated method stub
return null;
}

@Override
public int update(Uri uri, ContentValues values, String selection,
String[] selectionArgs) {
// TODO Auto-generated method stub
return 0;
}

}


we added a member of type DatabaseHelper db to hold a reference to our database.
also we added a static URi object that represents the URi of our content provider.
it has all the abstract methods implementations of the ContentProvider class. so lets check each method

onCreate() method:

the onCreate() method is the first method invoked when the content provider is created (similar to the Activitys onCreate() method). here you can load your database or check for files you may read/write to them.
the method return a Boolean. it should be true if everything is ok, otherwise it should be false.
in our case we will just reference our SQLite database:
@Override
public boolean onCreate() {
// TODO Auto-generated method stub
db=new DatabaseHelper(this.getContext());
if(db==null)
return false;
else
return true;
}

query() method:

the query() method is the method that gets invoked when a content provider data is requested by a URi.

but first lets talk a little about content providers URI.
the content provider URi has the following format:
content://Authority/[(n) path]/[instance indentifier]
explanation:
  • the URI starts with content:// scheme.
  • the authority is a unique identifier for the content provider.
  • the authority can be followed by one or more paths (optional) refer to data paths within the content.
  • there can be an instance identifier that refers to a specific data instance.
for example we can have a URi like this content://Employees/Marketing//11.
this URi has Employees as the authority, Marketing as a data path and 11 as an instance (employee) identifier.

back to our query method, we have the following parameters:
  1. Uri: the URi requested.
  2. String [] projection: representing the columns (projection) to be retrieved.
  3. String[] selection: the columns to be included in the WHERE clause.
  4. String[] selectionArgs: the values of the selection columns.
  5. String sortOrder: the ORDER BY statement.
the first step in our query method is to parse the client URi.
we expect the URi to be in one of the following forms:
  1. content://employees/: retrieves all employees.
  2. content://employees/id: retrieves a certain employee by ID.
  3. content://employess/IT: retreives employees of IT Dept.
  4. content://employess/HR: retrieves employees of HR Dept.
  5. content://employees/Sales: retreives employees of sales Dept.
so we will add some constatnt values to our class to refer to the above URis:
//authority and paths
public static final String AUTHORITY="employees";
public static final String ITPATH="IT";
public static final String HRPATH="HR";
public static final String SALESPATH="Sales";


//URiMatcher to match client URis
public static final int ALLEMPLOYEES=1;
public static final int SINGLEEMPLOYEE=2;
public static final int IT=3;
public static final int HR=4;
public static final int SALES=5;
then were going to define a URiMatcher object that matches the client URi
static final UriMatcher matcher=new UriMatcher(UriMatcher.NO_MATCH);
static{
matcher.addURI(AUTHORITY,null,ALLEMPLOYEES);
matcher.addURI(AUTHORITY, ITPATH, IT);
matcher.addURI(AUTHORITY, HRPATH, HR);
matcher.addURI(AUTHORITY, SALESPATH, SALES);
//you can use * as a wild card for any text
matcher.addURI(AUTHORITY, "#", SINGLEEMPLOYEE);
}
the static initializer block loads the URimatcher objects with the values to match when the class initializes.
so lets write our query method:
@Override
public Cursor query(Uri uri, String[] projection, String selection,
String[] selectionArgs, String sortOrder) {
SQLiteQueryBuilder builder=new SQLiteQueryBuilder();

builder.setTables(DatabaseHelper.viewEmps);

String order=null;
Cursor result=null;
if(sortOrder!=null)
order=sortOrder;
int match=matcher.match(uri);
switch(match)
{
case ALLEMPLOYEES:
//content://employees//id
result=builder.query(db.getWritableDatabase(), projection, selection, selectionArgs, null, null, sortOrder);
break;
case SINGLEEMPLOYEE:
//content://employees//id
Listsegments=uri.getPathSegments();
String empID=segments.get(0);
result=db.getEmpByID(empID);

break;
case IT:
//content://employees//IT
result=db.getEmpByDept("IT");
result=builder.query(db.getReadableDatabase(), projection, db.colDeptName+"=?", new String[]{"IT"}, null, null, sortOrder);
break;
case HR:
//content://employees//HR
result=db.getEmpByDept("HR");
result=builder.query(db.getReadableDatabase(), projection, db.colDeptName+"=?", new String[]{"HR"}, null, null, sortOrder);
break;
case SALES:
//content://employees//Sales
result=db.getEmpByDept("Sales");
result=builder.query(db.getReadableDatabase(), projection, db.colDeptName+"=?", new String[]{"Sales"}, null, null, sortOrder);

break;

}

return result;
}

the function just parses the URi and returns the data in a cursor.

Insert() method:
the insert methods inserts a new record to the db;
the insert method has the following form:
public Uri insert(Uri uri, ContentValues values) {

return null;
}
the method has two parameters:
  1. URi uri: the URi of the content provider, we need to check its correct.
  2. ContentValues values: object holding the info of the new item to be inserted.
the method returns the URi of the newly inserted item to be used for further manipulations.
so heres the implentation:
@Override
public Uri insert(Uri uri, ContentValues values) {
int match=matcher.match(uri);
//not the Uri were expecting
long newID=0;
if(match!=1)
throw new IllegalArgumentException("Wrong URi "+uri.toString());
if(values!=null)
{
newID=db.getWritableDatabase().insert(DatabaseHelper.employeeTable, DatabaseHelper.colName, values);
return Uri.withAppendedPath(uri, String.valueOf(newID));

}
else
return null;
}
we first check the Uri if it is not correct, throw an exception.
then check the content values object, if null return null otherwise insert the new item and return the URi with the id of the new item.
the Update() method:
the update method updates existing record(s) and returns the number of updated rows.
a trick rises from the fact that you need to specify whether to update a collection of records or a single record, based on the URi.
the method has the following parameters:
  1. URi uri: the URi of the content provider, we need to check its correct.
  2. ContentValues values: object holding the info of the new item to be inserted.
  3. String Selection : the filter to match the rows to update
  4. String [] selectionArgs : the values of the filter parameters
heres the implementation of the update method:
@Override
public int update(Uri uri, ContentValues values, String selection,
String[] selectionArgs) {
int match=matcher.match(uri);
//not the Uri were expecting
int rows=0;
//update single instance
if(match==2)
{
if(values!=null)
{
Listsegments=uri.getPathSegments();
String empID=segments.get(0);
rows=db.getWritableDatabase().update(DatabaseHelper.employeeTable, values,DatabaseHelper.colID+"=?", new String []{empID});

}

}
//update all emps in a certain dept
else if(match==3 ||match==4||match==5)
{
Listsegments=uri.getPathSegments();
String deptName=segments.get(0);
int DeptID=db.GetDeptID(deptName);
rows=db.getWritableDatabase().update(db.employeeTable, values,db.colDept+"=?", new String []{String.valueOf(DeptID)});

}
return rows;
}
the Delete() method:
the delete method has the following parameters:
  1. Uri uri: the URi of the content provider.
  2. String Condition: the condition of the delete statement.
  3. String[] args: the delete condition arguments

so heres the implementation:
@Override
public int delete(Uri uri, String where, String[] args) {

int match=matcher.match(uri);
//expecting the URi to be in the form of
if(match==1)
{
SQLiteDatabase dataBase=db.getWritableDatabase();
return dataBase.delete(db.employeeTable, where, args);
}
else
return 0;
}
we just check for the URi and perform a delete command.
The getType() method:
the last mthod to implement is getType() method which returns the MIME type associated with the URi passed to it.
if the URi is of a group of employees, then the MIME type is a collection type, otherwise its of an instance type
@Override
public String getType(Uri uri) {
int match=matcher.match(uri);
// single employee
if(match==2)
{
return "mina.android.Employee";
}
//collection of employees
else
{
return "mina.android.Employees";
}
}
Modifying the Manifest.xml file:
the last thing we need to do is to add an entry in our applications manifest.xml file to register our class as a content provider class.
so add this entry just below the <application>
<provider android_name="mina.android.DatabaseDemo.EmployeesContentProvider" 
android_authorities="employees"/>

the
when an application requests data through our content provider, Android system will search all the manifest files of all aplications on the device and when it finds such an entry, it will process the request

Testing the content provider:
now suppose you are in another activity and you want to use our activity.
Testing queries:
to make a query to retrieve all employees:
Uri empsUri=Uri.parse("content://employees");
Cursor cursor=getContentResolver().query(empsUri, null, null, null, null);Cursor cursor=getContentResolver().query(empsUri, null, null, null, null);
the cursor should have all the records.
to retrieve a certain employee by ID or all employees in a certain department:
Uri empUri=Uri.parse("content://employees//5");
Uri empDeptUri=Uri.parse("content://employees//Sales");

Inserting:
Uri empsUri=Uri.parse("content://employees");
ContentValues cvs=new ContentValues();
cvs.put("EmployeeName", "Mark Anderson");
cvs.put("Age", 35);
cvs.put("Dept", 1);
// URi of the new inserted item
Uri newEmp=getContentResolver().insert(empsUri, cvs);

Updating:
to update a single employee:
//Uri with the id of the employee
Uri empsUri=Uri.parse("content://employees/8");

Cursor cursor=getContentResolver().query(empsUri, null, null, null, null);
txt.setText(String.valueOf(cursor.getCount()));

ContentValues cvs=new ContentValues();
cvs.put("EmployeeName", "Mina Samy mod");
cvs.put("Age", 35);
cvs.put("Dept", 1);
// number of rows modified
int rowsNumber=getContentResolver().update(empsUri, cvs, "EmployeeID=?", new String[]{"8"});
to update all employees in a certain department
Uri empsUri=Uri.parse("content://employees/Sales");

Cursor cursor=getContentResolver().query(empsUri, null, null, null, null);
txt.setText(String.valueOf(cursor.getCount()));

ContentValues cvs=new ContentValues();
cvs.put("EmployeeName", "mod");
cvs.put("Age", 35);
cvs.put("Dept", 1);
int rowsNumber=getContentResolver().update(empsUri, cvs, "colDept=?", new String[]{"1"});

as a matter of fact, in both cases we dont need to specify the wher clause and the where parameters as they are implicitly specified in the URi. so we just can replace the update statement to be like this:
int rowsNumber=getContentResolver().update(empsUri, cvs, null,null);

Deleting:
I left the delete operation open to any criteria, you can delete a single employee or employees of a certain department or even all employees
Uri empsUri=Uri.parse("content://employees");
// delete employee of id 8
int rowsNumber=getContentResolver().delete(empsUri,"EmployeeID=?",new String[]{"8"});

Final Word:
creating a content provider for a certain type of data can be done in many ways, this example can be implemented in several variations.

another thing is that you need to create a strongly typed class for you data model to be used by clients accessing your content. in this example when I tested the query i wrote the column names of the database as strings like this: "EmployeeID" and "EmployeeName".
this is not ideal in a production release of an application. I should created a class library that holds all the info about the database to be used by other client applications.

you can download the source code for this example from here.
Read More..