Android Developing: Remove Auto focus from Edit Text: "When start Android application, it always auto focus EditText box. Here we give explain how to remove auto focus from EditText. Add your..."
Read More..
Showing posts with label auto. Show all posts
Showing posts with label auto. Show all posts
Tuesday, May 10, 2016

Tuesday, April 26, 2016
Sunday, April 24, 2016
Remote Service Android Developer Tutorial Part 9
Services typically are required to run for a long time and hence should run in their own thread. Such services can be invoked by any number of clients who want to connect to the service, invoke a few methods on the service and finally release the service, probably to serve more clients or close down.
Here, I would like to introduce you to the concept of connecting to a remote service and the kind of support provided by the android platform for the same.
We have earlier seen how local services can be created and used. The difference between the two mainly is that the local service runs in the same process as the application that started it and hence the life of the local service is dependent on the life of the said application while remote service can run in its own process. This causes a challenge of inter-process communication. If one process wants to communicate with another process, the object that is passed between the two needs to be marshaled.
For this purpose, Android provides the AIDL (Android Interface Definition Language) tool that handles the marshaling as well as the communication.
The service has to declare a service interface in an aidl file and the AIDL tool will automatically create a java interface corresponding to the aidl file. The AIDL tool also generates a stub class that provides an abstract implementation of the service interface methods. The actual service class will have to extend this stub class to provide the real implementation of the methods exposed through the interface.
The service clients will have to invoke the onBind() method on the service to be able to connect to the service. The onBind() method returns an object of the stub class to the client. Here are the code related code snippets:
The AIDL file:
package com.collabera.labs.sai;
interface IMyRemoteService {
int getCounter();
}
Once you write this AIDL file (.aidl) in eclipse, it will automatically generate the Remote interface corresponding to this file. The remote interface will also provide a stub inner class which has to have an implementation provided by the RemoteService class. The stub class implementation within the service class is as given here:
private IMyRemoteService.Stub myRemoteServiceStub = newIMyRemoteService.Stub() {
public int getCounter() throws RemoteException {
return counter;
}
};
The onBind() method in the service class:
public IBinder onBind(Intent arg0) {
Log.d(getClass().getSimpleName(), "onBind()");
return myRemoteServiceStub;
}
Now, let us quickly look at the meat of the service class before we move on to how the client connects to this service class. My RemoteService class is just incrementing a counter in a separate thread. This thread is created in the onStart()method as this gets certainly called whether the service is connected to by a call to startService(intent).Please read the lifecycle of a service if this needs more clarity. Here are the over-ridden onCreate(), onStart()and onDestroy()methods. Note that the resources are all released in the onDestroy()method.
public void onCreate() {
super.onCreate();
Log.d(getClass().getSimpleName(),"onCreate()");
}
public void onStart(Intent intent, int startId) {
super.onStart(intent, startId);
serviceHandler = new Handler();
serviceHandler.postDelayed(myTask, 1000L);
Log.d(getClass().getSimpleName(), "onStart()");
}
public void onDestroy() {
super.onDestroy();
serviceHandler.removeCallbacks(myTask);
serviceHandler = null;
Log.d(getClass().getSimpleName(),"onDestroy()");
}
A little explanation: In the onStart() method, I created a new Handler object that will spawn out a new task that implements the Runnableinterface. This thread does the job of incrementing the counter. Here is the code for the Task class – an inner class of the RemoteServiceclass.
class Task implements Runnable {
public void run() {
++counter;
serviceHandler.postDelayed(this,1000L);
Log.i(getClass().getSimpleName(), "Incrementing counter in the run method");
}
}
An object of this Taskclass is passed to the serviceHandler object as a message that needs to be executed after 1 second. The Taskclass implements the run() method in which we repeatedly post the same message to the serviceHandler. Thus, this becomes a repeated task till all the messages in the serviceHandlerqueue are deleted by calling the removeCallbacks()method on the serviceHandler in the destroy()method of the RemoteService class.
Note that the onDestroy()method thus stops this thread and set the service
Read More..
Saturday, March 26, 2016
Auto Complete Text View Android Beginner Dev Tutorial
This is a very simple tutorial on using Auto Complete Text View provided by Android SDK.
It consists of a single text box which can show suggestions based on a list of data that I provide as a source for this field. Just like Google Suggest, this also shows the nearest matches to the string that is being input by the end user.
So, here is the layout xml file:
<AutoCompleteTextView
android:id="@+id/AndroidBooks"
android:layout_width="fill_parent"
android:layout_height="wrap_content"></AutoCompleteTextView>
Nothing special. It just consists of one element.
Now in the main activity, I create an array of android books:
String[] androidBooks =
{
"Hello, Android - Ed Burnette",
"Professional Android 2 App Dev - Reto Meier",
"Unlocking Android - Frank Ableson",
"Android App Development - Blake Meike",
"Pro Android 2 - Dave MacLean",
"Beginning Android 2 - Mark Murphy",
"Android Programming Tutorials - Mark Murphy",
"Android Wireless App Development - Lauren Darcey",
"Pro Android Games - Vladimir Silva",
};
Then in the onCreate(..) method, I create an ArrayAdapter that I can pass to this AutoCompleteTextView as the data Source.
ArrayAdapter<String> adapter = new ArrayAdapter<String>(this,android.R.layout.simple_dropdown_item_1line,androidBooks);
Then, I get a handle to the AutocompleteTextView, and set the arrayAdapter to it along with the Threshold. The Threshold defines the number of charaters a user should type before the suggestions start showing up.
AutoCompleteTextView acTextView = (AutoCompleteTextView)findViewById(R.id.AndroidBooks);
acTextView.setThreshold(3);
acTextView.setAdapter(adapter);
That is it. Now execute and see it work.
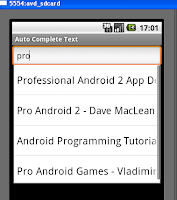 This is the way it would look:
The example code can be downloaded here.
Read More..
It consists of a single text box which can show suggestions based on a list of data that I provide as a source for this field. Just like Google Suggest, this also shows the nearest matches to the string that is being input by the end user.
So, here is the layout xml file:
<AutoCompleteTextView
android:id="@+id/AndroidBooks"
android:layout_width="fill_parent"
android:layout_height="wrap_content"></AutoCompleteTextView>
Nothing special. It just consists of one element.
Now in the main activity, I create an array of android books:
String[] androidBooks =
{
"Hello, Android - Ed Burnette",
"Professional Android 2 App Dev - Reto Meier",
"Unlocking Android - Frank Ableson",
"Android App Development - Blake Meike",
"Pro Android 2 - Dave MacLean",
"Beginning Android 2 - Mark Murphy",
"Android Programming Tutorials - Mark Murphy",
"Android Wireless App Development - Lauren Darcey",
"Pro Android Games - Vladimir Silva",
};
Then in the onCreate(..) method, I create an ArrayAdapter that I can pass to this AutoCompleteTextView as the data Source.
ArrayAdapter<String> adapter = new ArrayAdapter<String>(this,android.R.layout.simple_dropdown_item_1line,androidBooks);
Then, I get a handle to the AutocompleteTextView, and set the arrayAdapter to it along with the Threshold. The Threshold defines the number of charaters a user should type before the suggestions start showing up.
AutoCompleteTextView acTextView = (AutoCompleteTextView)findViewById(R.id.AndroidBooks);
acTextView.setThreshold(3);
acTextView.setAdapter(adapter);
That is it. Now execute and see it work.
The example code can be downloaded here.
Thursday, March 10, 2016
Context Menu Android Developer Tutorial
This is a follow up to the Options Menu Tutorial shared earlier.
To recap, the Context Menu is a floating list of menu items that appears when a user touches and holds a particular item displayed in the view, which has a menu associated with it.
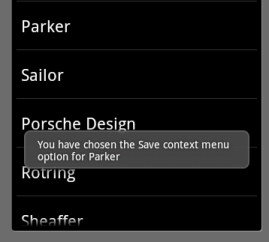
Going straight to the example, first I create a ListViewwith names of pens displayed. When one presses and holds one of the names for a long time, the context menu appears as shown here:

And when you click on any of the context menu shown above, the screen that appears is:
Let’s go to the code.
First, the mundane step of creating a Listview(you can see the ListView tutorial for more explanation on this).
I create a class ShowContextMenuextending the ListActivity. In its OnCreate(…) method, I associate the Listview array with the ListAdapater as shown here:
public class ShowContextMenu extends ListActivity {
/** Called when the activity is first created. */
@Override
public voidonCreate(Bundle savedInstanceState) {
super.onCreate(savedInstanceState);
setListAdapter(new ArrayAdapter<String>(this,
android.R.layout.simple_list_item_1, getResources().getStringArray(R.array.names)));
…
}
Note that instead of hard-coding the list items as string array within the class, I have followed the best practice of externalizing the strings into a strings.xml resource class. Hence I use getResources().getStringArray(R.array.names) to retrieve the array of pen names that I want to display in the List. The strings.xml file in the value folder has this entry:
<string-array name="names">
<item>MONT Blanc</item>
<item>Gucci</item>
<item>Parker</item>
<item>Sailor</item>
<item>Porsche Design</item>
<item>Rotring</item>
<item>Sheaffer</item>
<item>Waterman</item>
</string-array>
Once this Listview has been created, now we want to associate a ContextMenu with each of the rows in the Listview Item. i.e. is a user were to long-press one of the items, a menu should appear. For this we add the following line as well in the onCreate(..) method.
registerForContextMenu(getListView());
But how do we create the ContextMenu? Whenever the long-press happens, the onCreateContextMenu(…) method is invoked. So, we need to override this method as shown below:
public voidonCreateContextMenu(ContextMenu menu, View v, ContextMenuInfo menuInfo) {
super.onCreateContextMenu(menu, v, menuInfo);
MenuInflater inflater = getMenuInflater();
inflater.inflate(R.menu.context_menu, menu);
}
Here again, just as in Options Menu tutorial, I use a MenuInflater to create the context menu rather than do it programmatically. This is certainly a best practice of keeping the concerns separated. The View and the programming logic are kept separate as meant to be in Android Programming. The context menu consists of 4 items – Edit, Save, Delete, View. So, here is how it is defined in the context_menu.xml in the res/menu folder:
<menu
>="http://schemas.android.com/apk/res/android">
<item android:id="@+id/edit"
android:title="@string/edit" />
<item android:id="@+id/save"
android:title="@string/save" />
<item android:id="@+id/delete"
android:title="@string/delete" />
<item android:id="@+id/view"
android:title="@string/view" />
</menu>
I have an id that is associated with each of the menu items that uniquely identifies the menu item selected. And I have a String associated with it which is what is displayed on the Menu.
Now that the context menu is created, how to handle when the menu item is clicked? For this we need to override the onContextItemSelected(…) method as shown below;
Wednesday, March 9, 2016
To disable Chinese Japanese auto Characters – Android Emulator
Sometimes, when you are using the emulator, even if you type English characters, the emulator will be suggesting based on some Chinese /Japanese characters (I do not know the difference between the two). To disable this you need to go to Phone Settings in the emulator menus and remove the Japanese IME Settings. The path to that is in the main screen, click on the up-arrow (seen at the bottom) to see the menu. Select “settings”, navigate to “Language & Keyboard Settings”, and uncheck “Japanese IME”. You will be back to English suggestions / keyboard.
Read More..

