Pages

Showing posts with label and. Show all posts

Friday, May 13, 2016

Android Developers Blog Can I use this Intent

We all know that the loose coupling provided by Android through intents is one of its most powerful features. It makes it possible for us to mix and match the use of activities between various applications as though they all belong to one.

However, when I want to invoke another application that has published an intent filter, I cannot always assume that the other application is available on the phone. So, I need to check its availability and then only enable the feature to call it.

This is very well explained in the link: Android Developers Blog: Can I use this Intent?

Read More..

Thursday, May 12, 2016

Android NFC readBlock for MifareClassic to dump data in RFID tag


Last example "Android NFC read MifareClassic RFID tag, with android.nfc.action.TECH_DISCOVERED" read some general info of the RFID tag; such as type, size... This example dump the data inside the tag by calling readBlock() of MifareClassic.

Test on bland new MifareClassic RFID Card and Key.
(Android Studio project and signed APK are available on bottom of this post, you can test on your Android devices)


MifareClassic.readBlock() is an I/O operation and will block until complete. It must not be called from the main application thread. So we have to implement our AsyncTask to perform in background thread.

Modify MainActivity.java in last example:
package com.blogspot.android_er.androidnfctechdiscovered;

import android.content.Intent;
import android.nfc.NfcAdapter;
import android.nfc.Tag;
import android.nfc.tech.MifareClassic;
import android.os.AsyncTask;
import android.os.Bundle;
import android.support.v7.app.AppCompatActivity;
import android.widget.TextView;
import android.widget.Toast;

import java.io.IOException;

public class MainActivity extends AppCompatActivity {

private NfcAdapter nfcAdapter;
TextView textViewInfo, textViewTagInfo, textViewBlock;

@Override
protected void onCreate(Bundle savedInstanceState) {
super.onCreate(savedInstanceState);
setContentView(R.layout.activity_main);
textViewInfo = (TextView)findViewById(R.id.info);
textViewTagInfo = (TextView)findViewById(R.id.taginfo);
textViewBlock = (TextView)findViewById(R.id.block);

nfcAdapter = NfcAdapter.getDefaultAdapter(this);
if(nfcAdapter == null){
Toast.makeText(this,
"NFC NOT supported on this devices!",
Toast.LENGTH_LONG).show();
finish();
}else if(!nfcAdapter.isEnabled()){
Toast.makeText(this,
"NFC NOT Enabled!",
Toast.LENGTH_LONG).show();
finish();
}
}

@Override
protected void onResume() {
super.onResume();

Intent intent = getIntent();
String action = intent.getAction();

if (NfcAdapter.ACTION_TECH_DISCOVERED.equals(action)) {
Toast.makeText(this,
"onResume() - ACTION_TECH_DISCOVERED",
Toast.LENGTH_SHORT).show();

Tag tag = intent.getParcelableExtra(NfcAdapter.EXTRA_TAG);
if(tag == null){
textViewInfo.setText("tag == null");
}else{
String tagInfo = tag.toString() + " ";

tagInfo += " Tag Id: ";
byte[] tagId = tag.getId();
tagInfo += "length = " + tagId.length +" ";
for(int i=0; i<tagId.length; i++){
tagInfo += String.format("%02X", tagId[i] & 0xff) + " ";
}
tagInfo += " ";

String[] techList = tag.getTechList();
tagInfo += " Tech List ";
tagInfo += "length = " + techList.length +" ";
for(int i=0; i<techList.length; i++){
tagInfo += techList[i] + " ";
}

textViewInfo.setText(tagInfo);

//Only android.nfc.tech.MifareClassic specified in nfc_tech_filter.xml,
//so must be MifareClassic
readMifareClassic(tag);
}
}else{
Toast.makeText(this,
"onResume() : " + action,
Toast.LENGTH_SHORT).show();
}
}

public void readMifareClassic(Tag tag){
MifareClassic mifareClassicTag = MifareClassic.get(tag);

String typeInfoString = "--- MifareClassic tag --- ";
int type = mifareClassicTag.getType();
switch(type){
case MifareClassic.TYPE_PLUS:
typeInfoString += "MifareClassic.TYPE_PLUS ";
break;
case MifareClassic.TYPE_PRO:
typeInfoString += "MifareClassic.TYPE_PRO ";
break;
case MifareClassic.TYPE_CLASSIC:
typeInfoString += "MifareClassic.TYPE_CLASSIC ";
break;
case MifareClassic.TYPE_UNKNOWN:
typeInfoString += "MifareClassic.TYPE_UNKNOWN ";
break;
default:
typeInfoString += "unknown...! ";
}

int size = mifareClassicTag.getSize();
switch(size){
case MifareClassic.SIZE_1K:
typeInfoString += "MifareClassic.SIZE_1K ";
break;
case MifareClassic.SIZE_2K:
typeInfoString += "MifareClassic.SIZE_2K ";
break;
case MifareClassic.SIZE_4K:
typeInfoString += "MifareClassic.SIZE_4K ";
break;
case MifareClassic.SIZE_MINI:
typeInfoString += "MifareClassic.SIZE_MINI ";
break;
default:
typeInfoString += "unknown size...! ";
}

int blockCount = mifareClassicTag.getBlockCount();
typeInfoString += "BlockCount = " + blockCount + " ";
int sectorCount = mifareClassicTag.getSectorCount();
typeInfoString += "SectorCount = " + sectorCount + " ";

textViewTagInfo.setText(typeInfoString);

new ReadMifareClassicTask(mifareClassicTag).execute();

}

private class ReadMifareClassicTask extends AsyncTask<Void, Void, Void> {

/*
MIFARE Classic tags are divided into sectors, and each sector is sub-divided into blocks.
Block size is always 16 bytes (BLOCK_SIZE). Sector size varies.
MIFARE Classic 1k are 1024 bytes (SIZE_1K), with 16 sectors each of 4 blocks.
*/

MifareClassic taskTag;
int numOfBlock;
final int FIX_SECTOR_COUNT = 16;
boolean success;
final int numOfSector = 16;
final int numOfBlockInSector = 4;
byte[][][] buffer = new byte[numOfSector][numOfBlockInSector][MifareClassic.BLOCK_SIZE];

ReadMifareClassicTask(MifareClassic tag){
taskTag = tag;
success = false;
}

@Override
protected void onPreExecute() {
textViewBlock.setText("Reading Tag, dont remove it!");
}

@Override
protected Void doInBackground(Void... params) {

try {
taskTag.connect();

for(int s=0; s<numOfSector; s++){
if(taskTag.authenticateSectorWithKeyA(s, MifareClassic.KEY_DEFAULT)) {
for(int b=0; b<numOfBlockInSector; b++){
int blockIndex = (s * numOfBlockInSector) + b;
buffer[s][b] = taskTag.readBlock(blockIndex);
}
}
}

success = true;
} catch (IOException e) {
e.printStackTrace();
} finally{
if(taskTag!=null){
try {
taskTag.close();
} catch (IOException e) {
e.printStackTrace();
}
}
}

return null;
}

@Override
protected void onPostExecute(Void aVoid) {
//display block
if(success){
String stringBlock = "";
for(int i=0; i<numOfSector; i++){
stringBlock += i + " : ";
for(int j=0; j<numOfBlockInSector; j++){
for(int k=0; k<MifareClassic.BLOCK_SIZE; k++){
stringBlock += String.format("%02X", buffer[i][j][k] & 0xff) + " ";
}
stringBlock += " ";
}
stringBlock += " ";
}
textViewBlock.setText(stringBlock);
}else{
textViewBlock.setText("Fail to read Blocks!!!");
}
}
}
}


layout/activity_main.xml
<?xml version="1.0" encoding="utf-8"?>
<LinearLayout


android_layout_width="match_parent"
android_layout_height="match_parent"
android_padding="16dp"
android_orientation="horizontal"
tools_context=".MainActivity">

<LinearLayout
android_layout_width="0dp"
android_layout_height="match_parent"
android_layout_weight="1"
android_orientation="vertical">

<TextView
android_layout_width="wrap_content"
android_layout_height="wrap_content"
android_layout_margin="10dp"
android_layout_gravity="center_horizontal"
android_autoLink="web"
android_text="http://android-er.blogspot.com/"
android_textStyle="bold"/>

<TextView
android_id="@+id/info"
android_layout_width="match_parent"
android_layout_height="wrap_content"
android_textStyle="italic"/>

<TextView
android_id="@+id/taginfo"
android_layout_width="match_parent"
android_layout_height="wrap_content"
android_textStyle="bold"/>

</LinearLayout>

<ScrollView
android_layout_width="0dp"
android_layout_height="match_parent"
android_layout_weight="1">
<TextView
android_id="@+id/block"
android_layout_width="match_parent"
android_layout_height="wrap_content"
android_typeface="monospace"/>
</ScrollView>
</LinearLayout>

Other files, AndroidManifest.xml and nfc_tech_filter.xml, refer to last example "Android NFC read MifareClassic RFID tag, with android.nfc.action.TECH_DISCOVERED"

download filesDownload the files (Android Studio Format) .

download filesDownload APK .


- Similarly example run on Arduino: Arduino Uno + RFID-RC522, MFRC522 library example DumpInfo
- Step-by-step to make MFRC522-python work on Raspberry Pi 2/raspbian Jessie, read RFID tags using RFID Reader, RFID-RC522.
- Raspberry Pi 2 + MFRC522-python - Dump RFID Tag data using mxgxw/MFRC522-python

Read More..

Monday, May 9, 2016

Cara Mempercepat Booting Ponsel Android

Read More..

Sunday, May 1, 2016

Android Date and Time Controls

The Date-Time Controls in Android enable the user to pick date and time values and store them anywhere.
The date and time controls include:
1. DatePicker
2. Time Picker.
3. DatePickerDialog.
4. TimePickerDialog.
5. AnalogClock.
6. DigitalClock.
7. chronometer

DatePicker:

The DatePicker control enables the user to select a value of date only.
<?xml version="1.0" encoding="utf-8"?>
<LinearLayout
android_orientation="vertical"
android_layout_width="fill_parent"
android_layout_height="fill_parent"
>
<TextView
android_layout_width="fill_parent"
android_layout_height="wrap_content"
android_id="@+id/txt"
/>
<DatePicker
android_layout_width="fill_parent"
android_layout_height="wrap_content"
android_id="@+id/datePick"
/>
<Button
android_layout_width="wrap_content"
android_layout_height="wrap_content"
android_id="@+id/btn"
android_text="Select Date"
/>
</LinearLayout>


final DatePicker dp=(DatePicker)findViewById(R.id.datePick);
Button btn=(Button)findViewById(R.id.btn);
btn.setOnClickListener(new OnClickListener()
{

public void onClick(View arg0) {
// TODO Auto-generated method stub

TextView txt=(TextView)findViewById(R.id.txt);
txt.setText("You selected "+dp.getDayOfMonth()+"/"+(dp.getMonth()+1)+"/"+dp.getYear());
}

}

);

Notice that we add 1 to the value of DatePicker.getMonth() because the months range is from 0 to 11.

If you want to set an initial selected date for the DatePicker you can use:
DatePicker.init(year, monthOfYear, dayOfMonth, onDateChangedListener);

If you want to capture the date as the date changes in the control you can make the activity implements the OnDateChangedListener interface and implements the onDateChanged method
Calendar cal=Calendar.getInstance(Locale.ENGLISH);
dp.init(cal.getTime().getYear()+1900, cal.getTime().getMonth(), cal.getTime().getDay(), this);

then

public void onDateChanged(DatePicker view, int year, int monthOfYear,
int dayOfMonth) {
// TODO Auto-generated method stub
TextView txt=(TextView)findViewById(R.id.txt);
txt.setText("You selected "+view.getDayOfMonth()+"/"+(view.getMonth()+1)+"/"+view.getYear());
}


TimePicker:
TimePicker is like DatePicker but it displays time instead of date, here’s how it looks like:
<?xml version="1.0" encoding="utf-8"?>
<LinearLayout
android_orientation="vertical"
android_layout_width="fill_parent"
android_layout_height="fill_parent"
>
<TextView
android_layout_width="fill_parent"
android_layout_height="wrap_content"
android_id="@+id/txt"
/>
<TimePicker
android_layout_width="fill_parent"
android_layout_height="wrap_content"
android_id="@+id/TimePick"
/>
<Button
android_layout_width="wrap_content"
android_layout_height="wrap_content"
android_id="@+id/btn"
android_text="Select Date"
/>
</LinearLayout>


final TimePicker tp=(TimePicker)findViewById(R.id.TimePick);
Button btn=(Button)findViewById(R.id.btn);
btn.setOnClickListener(new OnClickListener()
{

public void onClick(View arg0) {
// TODO Auto-generated method stub

TextView txt=(TextView)findViewById(R.id.txt);
txt.setText("You selected "+tp.getCurrentHour()+":"+tp.getCurrentMinute());

Notice that by default the time picker displays the time in AM/PM format. If you want it to display time in 24-hours format you can use
TimePicker.setIs24HourView(boolen is24HourView);
If you want to initialize the timepicker with a certain time you can use the methods:

TimePicker.setCurrentHour(int Hour);
TimePicker.setCurrentMinute(int Minute);

You can implement the OnTimeChangedListener so that you capture any change in the time picker:
final TimePicker tp=(TimePicker)findViewById(R.id.TimePick);
tp.setCurrentHour(10);
tp.setCurrentMinute(45);

tp.setOnTimeChangedListener(new OnTimeChangedListener()
{

public void onTimeChanged(TimePicker arg0, int arg1, int arg2) {
// TODO Auto-generated method stub
TextView txt=(TextView)findViewById(R.id.txt);
txt.setText("You selected "+arg0.getCurrentHour()+":"+arg0.getCurrentMinute());
}

}
);

We checked so far the DatePicker and TimePicker widgets, but they take big space on the screen so Android provides similar controls but with different look: the DatePickerDialog and TimePickerDialog.

These widgets act the same as DatePicker and TimePicker but the appear as dialogs or popups instead of occupying a space on the screen

DatePickerDialog
DatePickerDialog is not a View, that you can’t define it in the xml layout file.
Instead you declare it from code with the following two constructors:
DatePickerDialog(Context context, DatePickerDialog.OnDateSetListener callBack, int year, int monthOfYear, int dayOfMonth);
DatePickerDialog(Context context, int theme, DatePickerDialog.OnDateSetListener callBack, int year, int monthOfYear, int dayOfMonth);

You can use it like this:
public void onCreate(Bundle savedInstanceState) {
super.onCreate(savedInstanceState);
setContentView(R.layout.main);
Button btn=(Button)findViewById(R.id.btn);

final OnDateSetListener odsl=new OnDateSetListener()
{

public void onDateSet(DatePicker arg0, int year, int month, int dayOfMonth) {
// TODO Auto-generated method stub
TextView txt=(TextView)findViewById(R.id.txt);
txt.setText("The date is "+dayOfMonth+"/"+month+"/"+year);
}

};

btn.setOnClickListener(new OnClickListener()
{

public void onClick(View arg0) {
// TODO Auto-generated method stub


Calendar cal=Calendar.getInstance();
DatePickerDialog datePickDiag=new DatePickerDialog(DateTimeControls.this,odsl,cal.get(Calendar.YEAR),cal.get(Calendar.MONTH),cal.get(Calendar.DAY_OF_MONTH));
datePickDiag.show();
}

}

);

}

To take an action when the date is set you define an OnDateSelectedListner and implement the onDateSet method

TimePickerDialog

DatePickerDialog is similar to DatePickerDialog but used for setting time.
The constructors for TimePickerDialog are:
TimePickerDialog(Context context, TimePickerDialog.OnTimeSetListener callBack, int hourOfDay, int minute, boolean is24HourView);

TimePickerDialog(Context context, int theme, TimePickerDialog.OnTimeSetListener callBack, int hourOfDay, int minute, boolean is24HourView);


You can use it like this:
public void onCreate(Bundle savedInstanceState) {
super.onCreate(savedInstanceState);
setContentView(R.layout.main);
Button btn=(Button)findViewById(R.id.btn);
}

final OnTimeSetListener otsl=new OnTimeSetListener()
{

public void onTimeSet(TimePicker arg0, int hourOfDay, int minute) {
// TODO Auto-generated method stub
TextView txt=(TextView)findViewById(R.id.txt);
txt.setText("The time is "+hourOfDay+":"+minute);
}
};

btn.setOnClickListener(new OnClickListener()
{

public void onClick(View arg0) {
// TODO Auto-generated method stub


Calendar cal=Calendar.getInstance();
TimePickerDialog timePickDiag=new TimePickerDialog(DateTimeControls.this,otsl,cal.get(Calendar.HOUR_OF_DAY),cal.get(Calendar.MINUTE),true);
timePickDiag.show();
}

}

);


AnalogClock

If you want to display time as in a clock you can use the AnalogClock widget. It just displays the time with no ability to edit the time.
<?xml version="1.0" encoding="utf-8"?>
<LinearLayout
android_orientation="vertical"
android_layout_width="fill_parent"
android_layout_height="fill_parent"
>
<TextView
android_layout_width="fill_parent"
android_layout_height="wrap_content"
android_id="@+id/txt"
/>

<AnalogClock
android_layout_width="wrap_content"
android_layout_height="wrap_content"
android_id="@+id/clock"
/>


</LinearLayout>


DigitalClock
Same as AnalogClock but displays a digital clock
<?xml version="1.0" encoding="utf-8"?>
<LinearLayout
android_orientation="vertical"
android_layout_width="fill_parent"
android_layout_height="fill_parent"
>
<TextView
android_layout_width="fill_parent"
android_layout_height="wrap_content"
android_id="@+id/txt"
/>

<DigitalClock
android_layout_width="wrap_content"
android_layout_height="wrap_content"
android_id="@+id/digitalClock"
/>


</LinearLayout>


ChronoMeter:

The ChronoMeter acts like a timer. It has a starting point and an endpoint and you can calculate the time elapsed between these two points.
Read More..

Friday, April 29, 2016

Threading in Android part 1 Handlers

Multi-Threading concept is essential in most platforms. it provides maximum

utilization of the processor. threading is used when the program executes

time consuming processes (such as calling a web service) and to give a

good user experience by unblocking the UI.

Android provides threading techniques to perform time consuming tasks in a

background thread with coordination with the UI thread to update the UI.

Android provides the following methods of threading:
  1. Handlers.
  2. Async. Tasks.
Handlers:
When you create an object from the Handler class, it processes

Messages and Runnable objects associated with the

current thread MessageQueue. the message queue holds the

tasks to be executed in FIFO (First In First Out) mannser. you will need

only ine Handler per activity where the background thread will

communicate with to update the UI.

The Handler is associated with the thread from which its been created

We can communicate with the Handler by two methods:
  1. Messages.
  2. Runnable objects.
In this post we will demonstrate how to use both using a simple example which is

updating the text of a TextView using multiple threads.

Using Messages:

the steps of using a Handler are as follows:
  1. You create a Handler object with an asscociated callback

    method to handle the received messages (it is the method where the UI update

    will be done).
  2. From the background thread you will need to send messages to the

    handler.
Heres the code of our activity:
public class MainActivity extends Activity {
TextView txt;
// our handler
Handler handler = new Handler() {
@Override
public void handleMessage(Message msg) {
//display each item in a single line
txt.setText(txt.getText()+"Item "+System.getProperty("line.separator"));
}
};

/** Called when the activity is first created. */
@Override
public void onCreate(Bundle savedInstanceState) {
super.onCreate(savedInstanceState);
setContentView(R.layout.main);
txt=(TextView)findViewById(R.id.txt);
}

@Override
protected void onStart() {
super.onStart();
// create a new thread
Thread background=new Thread(new Runnable() {

@Override
public void run() {
for(int i=0;i<10;i++)
{
try {
Thread.sleep(1000); b.putString("My Key", "My Value:

"+String.valueOf(i));
// send message to the handler with the current message handler

handler.sendMessage(handler.obtainMessage());
} catch (Exception e) {
Log.v("Error", e.toString());
}
}
}
});

background.start();
}
}
after running the following code the TextView will display the following,

each second a new line is written:

This example is pretty basic, it just sends the same message for a number of

times.
what if we want the message sent to hold data thats changed each time the

message is sent, the answer is to use Message.setData(Bundle bundle)

method by creating a Bundle object and adding the data to it like this:
public class MainActivity extends Activity {
TextView txt;
// our handler
Handler handler = new Handler() {
@Override
public void handleMessage(Message msg) {
// get the bundle and extract data by key
Bundle b = msg.getData();
String key = b.getString("My Key");
txt.setText(txt.getText() + "Item " + key
+System.getProperty("line.separator"));
}
};

/** Called when the activity is first created. */
@Override
public void onCreate(Bundle savedInstanceState) {
super.onCreate(savedInstanceState);
setContentView(R.layout.main);
txt = (TextView) findViewById(R.id.txt);
}

@Override
protected void onStart() {
super.onStart();
// create a new thread
Thread background = new Thread(new Runnable() {

@Override
public void run() {
for (int i = 0; i < 10; i++) {
try {
Thread.sleep(1000);
Message msg = new Message();
Bundle b = new Bundle();
b.putString("My Key", "My Value: " + String.valueOf(i));
msg.setData(b);
// send message to the handler with the current message handler
handler.sendMessage(msg);
} catch (Exception e) {
Log.v("Error", e.toString());
}
}
}
});

background.start();
}
}
we put a string to the bundle and send a message with that bundle. in the

handler method we receive the bundle and get the value with the predefined key.
after executing that code the text view would look like this:

Using Runnables:
another way to use Handlers is to pass them a Runnable by using the

Handler.post() method like this:
Runnable r=new Runnable() {

@Override
public void run() {
txt.setText("Runnable");

}
};

handler.post(r);

this will add the Runanble object to the message queue to be executed by

the handler.

Sending Messages in a

timely manner:
we can use handlers to send messages or post runnables at time intervals using

the following methods:

  1. handler.sendEmptyMessageAtTime(int what,long uptimeMillis):sends an
     empty message at a specific time in milli-seconds, can be defined by using the
    SystemClock.uptimeMillis() method to get the time since the device boot
     in milli-seconds and concatinating to it.
  2. handler.sendEmptyMessageDelayed(int what,long delayMillis):sends an
     empty message after a certain amount of time in milli-seconds.
  3. handler.sendMessageAtTime(Message msg,long uptimeMillis).
  4. handler.sendMessageDelayed(Message msg,long delayMillis).
  5. handler.postAtTime(Runnable r,long uptimeMillis).
  6. handler.postAtTime(Runnable r,Object token,long uptimeMillis):posts a
     runnable with an object as a distinguishing token.
  7. handler.postDelayed(Runnable r,long delayMillis).
All the above messages return a boolean indicating whether the message or the

runnable has been placed successfully in the message queue.

Removing Call backs:
if you want to remove a runnable or a message from the message queue, you can

use the following methods:

  1. handler.removeCallbacks(Runnable r).
  2. handler.removeCallbacks(Runnable r,Object token).
  3. handler.removeCallbacksAndMessages(Object token).
  4. handler.removeMessages(int what).
  5. handler.removeMessages(int what,Object object)
Read More..

Saturday, April 23, 2016

Do you want to write on Android Revolution HD blog

Its time to expand. This place has a potential and I want it to become even more popular. If you are interested in making this place even better and more crowded, please keep reading!

So, what I am looking for?

Strong written English
This is essential. Its fine if English isnt your first language, its not if I have to rewrite all your posts. Your grammar and variety of vocabulary must be at an advanced level.

Good understanding of mobile tech and an attention to detail
Know the areas you want to write about, know the sources and strive for accuracy. Your articles must have some particular level of quality, otherwise it cant be published.

Have an opinion
Re-posting news from other tech-sites is not welcomed. You need to be able to understand what things mean, put it in context and share your thoughts with our readers. Im more interested in creating the opinion rather then passing some news along.

Regular contribution
This isnt a job offer, but this might change in the future. For now I want to create a friendly place where dedicated people can share their thoughts (and there is a lot to share nowadays). I ask that all applicants are able to post on average 1-2 times a week. News posts dont have to be thousands of words, in most cases a couple of hundred will suffice.

Technologies
Im mostly interested in Android / Windows Phone articles, however the variety of potential topics is: "Linux Kernels" | "Linux General" | "Android General" | "Android Devices" | "Windows Devices" | "Other OS Devices" | "Tablets" | "Gadgets" | "Manufacturers News" | "PC News" | "your idea".


There is no age limitation. Everyone can have hobby and be addicted to gadgets :)

How to apply
Please contact us via our Twitter profile: Twitter
Read More..

Tuesday, April 12, 2016

Stickman And Gun Unlimited GOLD Skill point Android Game Moded


Salam blogger :)
Masih malam belom pagi, dan waktunya untuk share game mod terbaru. Game ini simple kita hanya perlu berlari dan menembak. ya kalo di bilang sih simpe tapi pas udh maen pasti ribet dan susah kalo tanpa mod. disini kita bsa memilih 3 hero yaitu warrior, archer & Mage. masing2 hero punya kemampuan berbeda. oke langsung aja yak cek it sendiri :

Details Game: 
Name      : Stickman And Gun
Genre      : Action
Platform  : Android 
Requires  : Android 2.3.3  and up

Modification on Game: 
- Unlimited Gold
- Unlimited Skill Point

Review Modif:

Screenshoot:


Tutorial Instal : 
1. Download game. 
2. Pindahkan Game ke Androidmu.
3. Uniinstal Version originalnya, jika ada.
4. Instal MOD apk & Play
5. Enjoyyy 


|DOWNLOAD|
Stickman And Gun - Unlimited GOLD & Skill point[Android Game : Moded]

|Download Original game|
On Playstore

#Salam Blogger
#Semoga bermanfaat :)
#Ask? comment :)
Read More..

Saturday, April 9, 2016

Options Menu Android Developer Tutorial

Almost every application will need a menu in order to facilitate a user to perform actions on the application. In Android there are three types of menus possible.

  1. Options Menu
  2. Context Menu
  3. Sub Menu

The Options menu is the one that appears when a user touches the menu button on the mobile. This is something that is associated with an activity.  In 3.0 and later, this is available in the Action Bar itself for quick access.

In this article, I am showing how to create an Options Menu for devices having Android 2.3 or below.

The Context Menu is a floating list of menu items that appears when a user touches and holds a particular item displayed in the view, which has a menu associated with it.

The Sub Menu is a floating list of menu items that appears when the user touches a menu item that contains a nested menu.

There are two ways of creating an Options Menu in your application. One is by instantiating the Menu class and the other is by inflating a Menu from an XML menu resource.  Based on best practices it is always better to define the Menu in an XML and inflate it in your code.

Now, let us start with the example.

I am going to just define 3 menu items in the XML. Inflate it in my code. And when a user clicks on any of the menu items, I just Toast a message on what has been clicked.

NOTE: This is as usual not a practically useful piece, but sticking to my style, I want to keep it as uncluttered and as simple as possible so that the learning happens easily. And the focus is only on what concept we are trying to learn.

So, here is my options_menu.xml that is created in the res/menu folder:

<?xml version="1.0" encoding="utf-8"?>
<menu >="http://schemas.android.com/apk/res/android">
      <item android:id="@+id/next"
              android:icon="@drawable/ic_next"
              android:title="@string/next" />
      <item android:id="@+id/previous"
            android:icon="@drawable/ic_previous"
            android:title="@string/previous" />
      <item android:id="@+id/list"
            android:icon="@drawable/ic_list"
            android:title="@string/list" /> 
</menu>

You see that the Menu root node consists of 3 item leaf nodes. Each of the items consists of an idicon and title. The resource id is unique to that item and it allows the application to recognize which item has been clicked by the user. The icon is a drawable that should exist in the res/drawable folder and is the one shown in the menu item. The string is the item’s title.

The above assumes that you have three images ic_next, ic_previous and ic_list copied into the drawable folder. It goes without saying that these image sizes should be kept as small as possible.
Once this is ready, we will create a class called ViewOptionsMenu. It’s onCreate(…) method would be a simple one calling the super method and displaying the content as shown below.

    public void onCreate(Bundle savedInstanceState) {
        super.onCreate(savedInstanceState);
            setContentView(R.layout.main);
    }

The main.xml just shows the message: “Click on the Options Menu to view the available Menu Options”.  This message as per the norm is defined in the strings.xml file that exists in the res/values folder. Here are the contents of the main.xml

<?xml version="1.0" encoding="utf-8"?>
<LinearLayout >="http://schemas.android.com/apk/res/android"
    android:orientation="vertical"
    android:layout_width="fill_parent"
    android:layout_height="fill_parent"
    >
<TextView 
    android:layout_width="fill_parent"
    android:layout_height="wrap_content"
    android:text="@string/welcome"
    android:textSize="20sp" android:textStyle="bold" android:capitalize="none" android:typeface="sans"/>
</LinearLayout>

Now, I need to override the method:  onCreateOptionsMenu(Menu menu). This method is called by Android the first time the activity is loaded. This is so for Android 2.3 and below.  Here is the code:

    public boolean onCreateOptionsMenu(Menu menu) {
      MenuInflater inflater = getMenuInflater();
      inflater.inflate(R.menu.options_menu, menu);
      return true;
    }

This method is getting a handle to the MenuInflater and using it to inflate the options menu that we have defined earlier in options_menu.xml in the res/menu folder.  That is it. The Menu is created. Isn’t is so simple?

Now, that the menu is created, how do we respond to the user when he clicks on the menu. This is done by overriding the onOptionsItemSelected(MenuItem item) method in the Activity itself as shown below:

public boolean onOptionsItemSelected(MenuItem item) {
      switch (item.getItemId()) {
      case R.id.next:
            Toast.makeText(this"You have chosen the " + getResources().getString(R.string.next) + " menu option",
Read More..

Image Switcher View Android Developer Tutorial


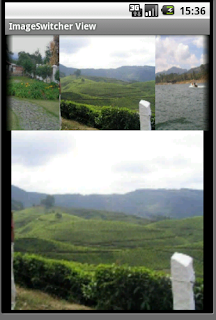
Now we will explore ImageSwitcher View. It is a view useful to switch smoothly between two images and thus provides ways of transitioning from one to another through appropriate animations.

We will implement the same concept of showing a gallery of images that scrolls at the top of the android screen landscape and upon selection of one image, it gets displayed as a larger image in the lower part through the use of an ImageSwitcher. This is what I had done earlier in the GalleryView tutorial but now instead of showing the selected picture through an ImageView, I will show it using a ImageSwitcher. Though the output may seem very similar, lot of other methods are available on the ImageSwitcher that can be used, if required.

Here is how the output would look (NOTE that I have not used the default gallery background provided by Android in the Gallery images)


So, to begin with, first we need to declare the layout xml to have a gallery and the ImageSwitcher:

<Gallery
      android:id="@+id/Gallery01"
      android:layout_width="fill_parent"
      android:layout_height="wrap_content"></Gallery>
<ImageSwitcher
      android:id="@+id/ImageSwitcher01"
      android:layout_width="fill_parent"
      android:layout_height="fill_parent">
</ImageSwitcher>

The next thing that we need to do is create a class that not only extends Activity but also implements ViewFactory. The ViewFactory is a Interface that creates views that need to be shown in the ImageSwitcher. So it has one method makeView() which we need to implement. It is here that we can set the attributes of the ImageView that would be shown within the ImageSwitcher -  like its background, it scale, its layout parameters etc. – typically those attributes that we would have otherwise statically set through a layout xml.

Here is the class declaration and the method makeView():

public class ImageSwitcherView extends Activity implements ViewFactory {

and
      @Override
      public View makeView() {
            ImageView iView = new ImageView(this);
            iView.setScaleType(ImageView.ScaleType.FIT_CENTER);
            iView.setLayoutParams(new
                        ImageSwitcher.LayoutParams(
                                    LayoutParams.FILL_PARENT,LayoutParams.FILL_PARENT));
            iView.setBackgroundColor(0xFF000000);
            return iView;
      }
This alone is the real difference from the Gallery example.

Other smaller things we need to do is get a handle to the ImageSwitcher in the onCreate() method:

            iSwitcher = (ImageSwitcher) findViewById(R.id.ImageSwitcher01);
            iSwitcher.setFactory(this);
            iSwitcher.setInAnimation(AnimationUtils.loadAnimation(this,
                        android.R.anim.fade_in));
            iSwitcher.setOutAnimation(AnimationUtils.loadAnimation(this,
                        android.R.anim.fade_out));

Here we also set the animation on how the image should fly in and fly out of the area. Then, we get a handle to the gallery and set an ImageAdapter to it. The ImageAdpater is as described in my Gallery Example. If you have not seen that, please go through that and then try this example, as I would not want to repeat myself here.
Now on the click of a gallery image, we would want to pass the selected image to the ImageSwitcher and this is what we do here:

            gallery.setOnItemClickListener(new OnItemClickListener() {

                  @Override
                  public Read More..