Pages

Showing posts with label notification. Show all posts

Friday, April 15, 2016

How Twitter used Doze in Android 6 0 Marshmallow to Improve Notification Performance

Posted by Laurence Moroney, Developer Advocate

In October, we published a blog post about how Google Cloud Messaging (GCM) works with Doze in Android 6.0 Marshmallow to bring performance and usability improvements to the user. In this scenario, normal priority messages allow the device to stay in Doze, while high priority messages take the device out of Doze. For a great example of this capability and best practices on Android, we’ve spoken with the engineering team at Twitter.

Twitter has researched extensively which messages should get high priority -- given that this priority can awaken a device in Doze. To meet their particular need, Twitter wanted Direct Messages to be delivered on high priority, where mentions would be at normal priority.

Luke Millar, Android Engineering Manager at Twitter commented "With Android M we have a greater ability to be good citizens when it comes to conserving battery life. This feature lets us specify which notifications will wake up a device in Doze and which ones wont. Normally, we tell GCM to wait to deliver push notifications until the next time the users phone wakes up. However, users expect to receive some push notifications immediately, like notifications for Direct Messages, so we set those as high priority. Its nice being able to specify when and how those notifications make it to our users."

To test Doze, Twitter’s engineers followed the steps outlined on the Android Developers site. These guide you to use adb commands to simulate doze on either a physical or virtual device. Following this method, Twitter was able to successfully test how their messaging priorities would work in a real-world environment.

One other best practice that Twitter used was in transmitting larger payloads, such as when delivering Twitter Highlights. In this case, they opted to pass metadata in the notification, which was then used to sync the application to get the requested Highlights. In other words, they didn’t transmit the contents of Highlights in a notification, instead triggering a sync mechanism to update the contents of the app.

For more details on using GCM with your app in standby environments, check out the documentation.
You can learn more about Google Cloud Messaging and how to use it for notifications in your Android, iOS and Web Applications at the Google Developers site here.

Read More..

Saturday, April 9, 2016

Image Switcher View Android Developer Tutorial


Now we will explore ImageSwitcher View. It is a view useful to switch smoothly between two images and thus provides ways of transitioning from one to another through appropriate animations.

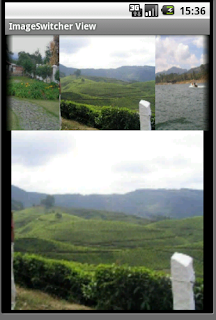
We will implement the same concept of showing a gallery of images that scrolls at the top of the android screen landscape and upon selection of one image, it gets displayed as a larger image in the lower part through the use of an ImageSwitcher. This is what I had done earlier in the GalleryView tutorial but now instead of showing the selected picture through an ImageView, I will show it using a ImageSwitcher. Though the output may seem very similar, lot of other methods are available on the ImageSwitcher that can be used, if required.

Here is how the output would look (NOTE that I have not used the default gallery background provided by Android in the Gallery images)


So, to begin with, first we need to declare the layout xml to have a gallery and the ImageSwitcher:

<Gallery
      android:id="@+id/Gallery01"
      android:layout_width="fill_parent"
      android:layout_height="wrap_content"></Gallery>
<ImageSwitcher
      android:id="@+id/ImageSwitcher01"
      android:layout_width="fill_parent"
      android:layout_height="fill_parent">
</ImageSwitcher>

The next thing that we need to do is create a class that not only extends Activity but also implements ViewFactory. The ViewFactory is a Interface that creates views that need to be shown in the ImageSwitcher. So it has one method makeView() which we need to implement. It is here that we can set the attributes of the ImageView that would be shown within the ImageSwitcher -  like its background, it scale, its layout parameters etc. – typically those attributes that we would have otherwise statically set through a layout xml.

Here is the class declaration and the method makeView():

public class ImageSwitcherView extends Activity implements ViewFactory {

and
      @Override
      public View makeView() {
            ImageView iView = new ImageView(this);
            iView.setScaleType(ImageView.ScaleType.FIT_CENTER);
            iView.setLayoutParams(new
                        ImageSwitcher.LayoutParams(
                                    LayoutParams.FILL_PARENT,LayoutParams.FILL_PARENT));
            iView.setBackgroundColor(0xFF000000);
            return iView;
      }
This alone is the real difference from the Gallery example.

Other smaller things we need to do is get a handle to the ImageSwitcher in the onCreate() method:

            iSwitcher = (ImageSwitcher) findViewById(R.id.ImageSwitcher01);
            iSwitcher.setFactory(this);
            iSwitcher.setInAnimation(AnimationUtils.loadAnimation(this,
                        android.R.anim.fade_in));
            iSwitcher.setOutAnimation(AnimationUtils.loadAnimation(this,
                        android.R.anim.fade_out));

Here we also set the animation on how the image should fly in and fly out of the area. Then, we get a handle to the gallery and set an ImageAdapter to it. The ImageAdpater is as described in my Gallery Example. If you have not seen that, please go through that and then try this example, as I would not want to repeat myself here.
Now on the click of a gallery image, we would want to pass the selected image to the ImageSwitcher and this is what we do here:

            gallery.setOnItemClickListener(new OnItemClickListener() {

                  @Override
                  public Read More..

Tuesday, March 22, 2016

Granny Smith v1 3 2 Full

From the makers of Sprinkle!
"Mediocre is proving themselves the Pixar of the mobile gaming scene, and has once again, hit one out of the ballpark." [Phandroid]
"Gaming app of the day" [Kotaku]
"Another great looking release from the Sprinkle crew, one that provides hours of entertainment without a steep learning curve" [JayIsGames]

"Buying the Granny Smith game is the best buck youll spend this week" [Android Central]
Granny Smith loves her apples, but a bewheeled thief is stealing from her precious garden! Help Mrs. Smith as she swiftly skates through farmland and cityscapes, crashing through everything from barns to offices in the pursuit of fruit. Get to the apples before the thief does!
Granny Smith is a fast-paced racing platformer filled with spectacular crashes and amazing stunts. Jump, glide, swing and smash your way through 57 hand-crafted levels in four distinct settings. Just be sure to land on your feet!

Features:
* Spectacular physics – Granny Smith uses some of the most advanced destruction physics in mobile games. Crash through crates and windows and watch the pieces fly all over!
* Dazzling visuals – Zoom through dozens of vibrant, whimsical worlds! Each level is like a fanciful, three-dimensional storybook.
* Intuitive controls – Help Granny pull off crazy moves with simple two-button controls – perfect for both tablets and phones.
* Vintage replays – Watch your best runs in retro movie style with cool camera angles and slow-motion effects!
* Power Granny up – Collect coins and equip Granny with a helmet, banana peels and baseballs. If Granny is getting old, you have two alternative characters to play with – Scruffy and Stanley!
* Additional breakable objects, grass, flowers and dust particles on NVIDIA Tegra 3 devices.
With the apple thief on the loose, Granny is going to need some help. Hop to it!

Whats New
* Leaderboards and achievements through Google Play Game Services. Challenge your friends and collect trophies!
* Resume from lock screen bugfix on some phone models
* Faster switch to main menu

Read Here: How to Install APK

Requirements: Android 2.3+
File Size: 20 MB
Download Link: Mediafire.com
Read More..

Service and Notification Android Tutorial for Beginners – Part 8


Now that we have worked with services and notifications separately, we are all ready to use the two together to make a real service that is notified to the user through a status bar update that the service is running. The status bar removes the notification as soon as the service is stopped.


In this program, I also increment a counter once the service starts to show that the service is continuously running in the background while we do other work. When we stop the service we are able to see the updated count.


Let us look at the code:


I have created a class NotifyService which extends the service class. This is the service class that will be started through the activity – ServiceLauncher


Now let us see what the service does?


It does 3 things – Toast a message that the service has started. Update the status bar with a notification. Finally start incrementing the counter. All this is done in the onCreate() method of the NotifyService Class


Toast.makeText(this,"Service created at " + time.getTime(), Toast.LENGTH_LONG).show();
showNotification();          
            incrementCounter();


Here is theshowNotification() Method:


    private void showNotification() {
 CharSequence text = getText(R.string.service_started);
 Notification notification = new Notification(R.drawable.android, text, System.currentTimeMillis());
 PendingIntent contentIntent = PendingIntent.getActivity(this, 0,
                new Intent(this, ServiceLauncher.class), 0);
notification.setLatestEventInfo(this, getText(R.string.service_label),
      text, contentIntent);
nm.notify(R.string.service_started, notification);
    }


Finally, here is the method for incrementing the counter incrementCounter():


    private void incrementCounter() {
timer.scheduleAtFixedRate(new TimerTask(){ public void run() {counter++;}}, 0, 1000L);
    }


On stopping the service, it obviously has to do the reverse actions: stop the counter, remove the status bar notification and then toast a message to the end user saying the service has stopped! So here it is:


      shutdownCounter();
      nm.cancel(R.string.service_started);
      Toast.makeText(this, "Service destroyed at " + time.getTime() + "; counter is at: " + counter, Toast.LENGTH_LONG).show();
      counter=null;


This is the code in the onDestroy()method in the NotifyServiceclass.


With this the service is ready. But we need to be able to start this service and stop it. This I have done through a ServiceLauncher class just as I had done in the previous part of this series. You can get the complete code here.

Read More..